Nothing says summer quite like a cold, colorful treat on the 4th of July. I always want to make something festive, but with work and family plans, I don’t have time for fancy desserts. These red, white, and blue popsicles check all the boxes—easy to prep, healthy, and fun for everyone.
Each pop layers sweet berries and creamy yogurt together for a pretty look that melts slowly. I love that the ingredients are simple and the process is stress-free. If you’re looking for a low-fuss way to add a little sparkle to your July 4th, these popsicles are the answer.

Table of Contents
Why You’ll Love This 4th of July Popsicles Recipe
You don’t need to stand over a hot stove or fuss with a dozen supplies just to pull off a treat everyone will cheer for. These 4th of July popsicles have just a few simple steps, taste great, and look like party décor all on their own. Even with a jam-packed schedule, you’ll find these pops fit right in.
Quick and Easy for Busy Schedules
Time is precious, especially when you’d rather be playing outside or catching fireworks. With this recipe, you can set up the popsicles in about 15 minutes of hands-on time. The freezer does the rest. No complicated gadgets or skills needed. Just blend, layer, and freeze.
Healthy, Simple Ingredients
No strange powders or syrups here—just fruit, yogurt, and a touch of honey or maple syrup. You can swap for coconut milk to keep it dairy-free. I use berries because they’re loaded with color and sweet without being heavy, so these popsicles feel light and fresh.
Here’s what I love about these pops:
- Real fruit and yogurt, so you skip extra sugar found in store-bought brands
- Only a few ingredients to keep grocery trips short
- Easy swaps for food allergies or personal taste

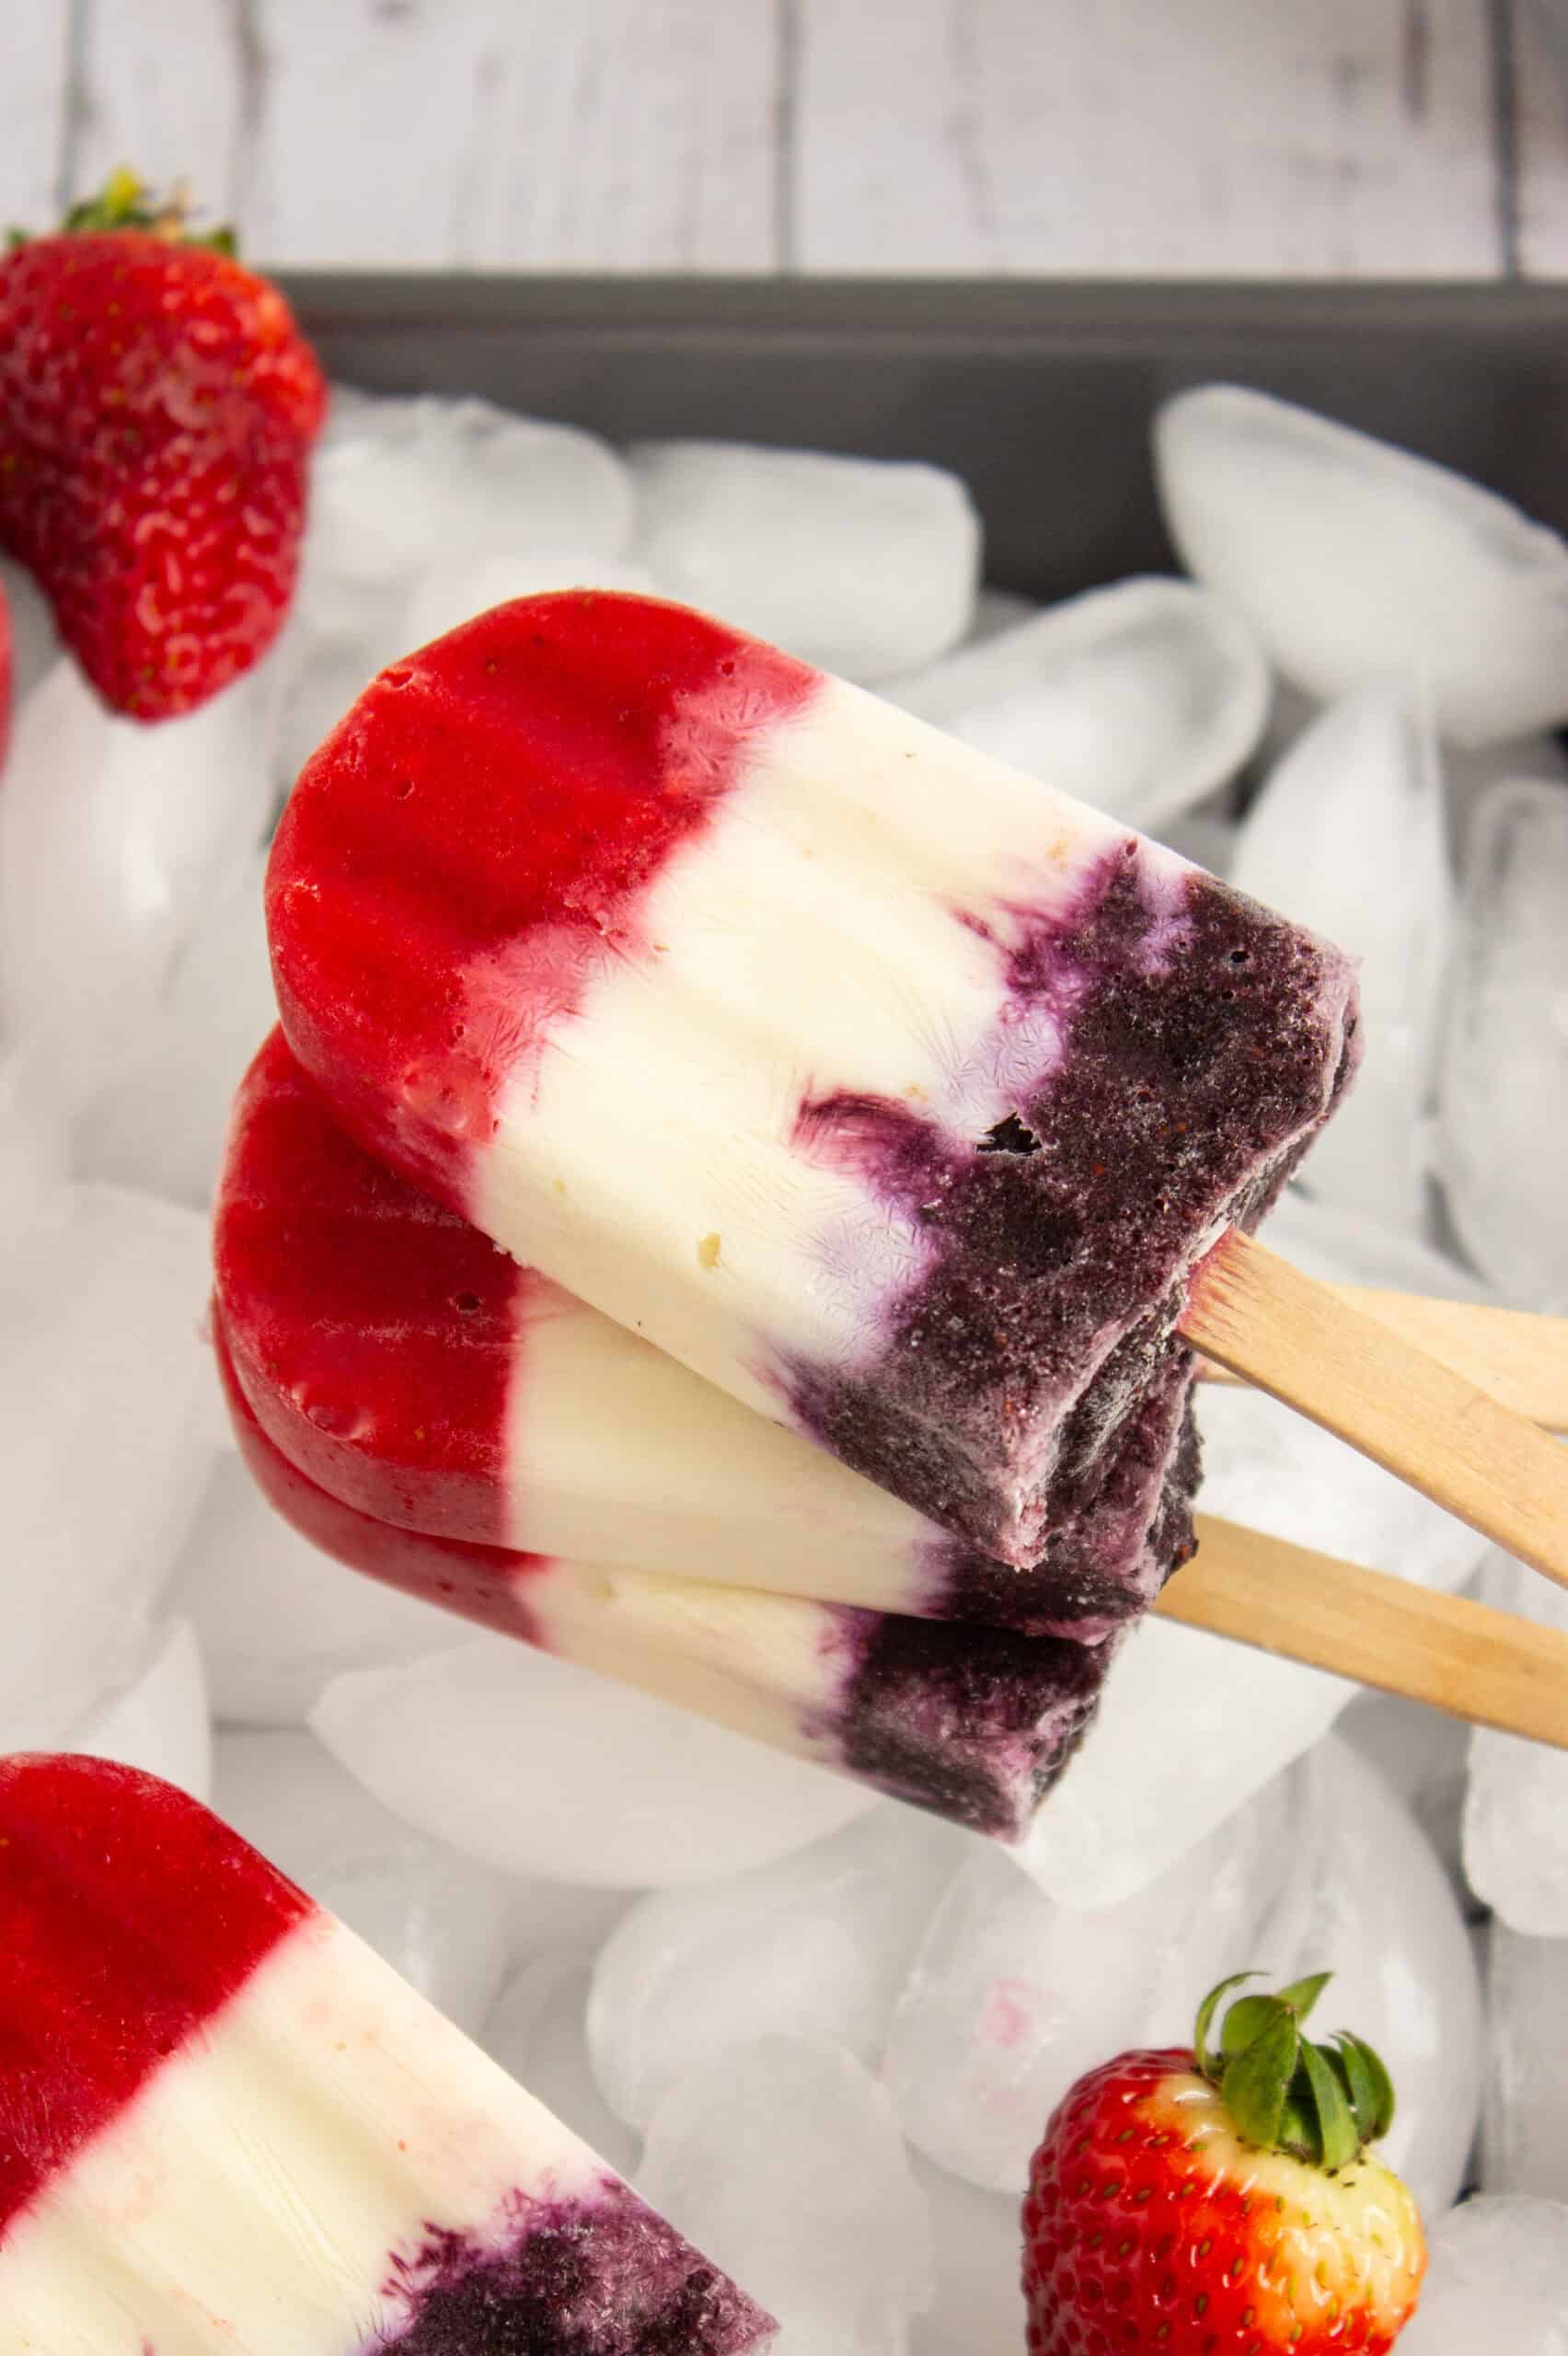
Eye-Catching Layers
The popsicles look just as good as any store treat. The bright red, white, and blue stripes show up clearly after freezing, turning snack time into a mini celebration. Set them out on a platter, and people will reach for them before you say a word.
- The layers let you get creative—add extra berries or swirl the yogurt for fun patterns
- Kids and adults both light up when they see the pretty stripes
Naturally Cool and Refreshing
Hot July days demand something cold. These popsicles do the job without weighing you down like a heavy dessert. They’re creamy, fruity, and melt at just the right speed—enough for long chats on the porch but not so slow they drip everywhere.
Perfect for Sharing and Prepping Ahead
You can make a batch ahead of time and keep them in the freezer. That’s party power, especially when surprise guests show up. Just pop a few out and watch everyone cool off and smile.
- Makes 12 popsicles per batch—enough for a crowd
- Kid-approved, grown-up friendly, and easy to double
With so many reasons to love this recipe, you’ll keep coming back to it every summer!
Ingredients and Tools Needed for Red, White, and Blue Popsicles
Ready to chill out with a patriotic treat? Before we start layering those classic 4th of July colors, let’s talk about what you’ll actually need. This recipe keeps it simple, using good-for-you ingredients and only basic kitchen gear. No fancy gadgets or secret potions. Here’s the full rundown so you can prep and pop without any stress.

Ingredients for Each Layer
This recipe uses real fruit and yogurt, so you get popsicles that taste fresh and sweet, not artificial. Here’s what goes in each colorful layer:
- Red Layer
- 1 cup strawberries or raspberries (fresh or frozen work great)
- 1 tablespoon honey or maple syrup (for sweetness)
- 1 to 2 tablespoons water (just in case you need help blending)
- White Layer
- 3/4 cup Greek yogurt (or swap in coconut milk for dairy-free)
- 1 tablespoon honey or maple syrup
- 1/2 teaspoon vanilla extract
- Blue Layer
- 1 cup blueberries (fresh or frozen)
- 1 tablespoon honey or maple syrup
- 1 to 2 tablespoons water (if needed for blending)
You can adjust the type of fruit or brand of yogurt based on what you have on hand. If you like your pops less sweet, ease up on the honey or syrup. Want to swap the yogurt? Go for it! This recipe can handle some quick changes.
Tools You’ll Need
No need to dig through every kitchen drawer. Here’s what you really need to pull these pops together:
- Blender or Food Processor: Makes quick work of the fruit layers.
- Mixing Bowl and Spoon: For stirring together that creamy white layer.
- Popsicle Molds: Go for a set that makes at least 12 pops. Silicone or plastic work fine.
- Popsicle Sticks: Most molds come with reusable sticks, but classic wooden ones add a fun touch.
- Measuring Cups and Spoons: To keep the flavors balanced.
- Freezer Space: Clear a flat spot so the molds can sit upright while the pops freeze.
If you don’t have popsicle molds, small paper cups or even ice cube trays with toothpicks can stand in. Just keep it simple and have fun with it.
Tips Before You Start
A few pro moves save time and hassle:
- Wash and dry your fruit before blending.
- Taste the blended fruit before freezing. Add more sweetener if you like.
- Set out all your tools first so you’re not running around the kitchen.
- Double the batch if you want leftovers—these go fast!
With your ingredients and tools ready, there’s nothing stopping you from making a batch of the coolest snacks on the block.
Step-by-Step Instructions With In-Process Tips
Layering red, white, and blue into one popsicle makes the 4th of July feel extra special. With each step, the colors come together to form stripes that pop. I like to keep things simple, moving from fruity to creamy to juicy blue. Here’s exactly how I build these pops—with quick tips at each stage so they look and taste like a treat from a fancy ice cream truck.
1. Prepare the Red Layer
The red layer sets the stage for that patriotic look. I start by picking bright fruits for max color and flavor. Strawberries and raspberries work best since they blend easily, but you can swap in cherries if that’s more your style.
Best fruits for red: Strawberries, raspberries, or even a mix of both.

Tips for flavor: If the fruit isn’t sweet, toss in some honey or maple syrup.

Blending: Place your fruit, a spoon of sweetener, and just a splash of water into a blender or food processor. Blend until smooth.

If it looks too thick, add a little more water.

Getting the layer right: Pour or spoon about 1/3 of the way up your popsicle molds with the red mix. Give the molds a gentle tap on the counter to level everything out.

In-process tip: Wipe away any drips on the sides with a paper towel. That keeps the layers crisp instead of muddy.
Pop the molds into the freezer for at least 30 minutes. The layer should feel set before adding the next.
2. Add the White Layer
The white layer gives these popsicles a creamy, mellow stripe. You want this to be thick but still easy to pour so it floats above the red instead of mixing with it.
Best choices for white: Greek yogurt for a rich taste or coconut milk for a dairy-free option.

Mixing: Stir together your yogurt or coconut milk, and honey.

Then add vanilla. The scent alone makes me hungry.

Pouring technique: Let the red layer get firm first so the white doesn’t sink. Spoon or gently pour the yogurt mixture over the red, filling the mold another third of the way.

Leveling up: Slightly tilt the mold and use the back of a spoon to spread the white across the red, keeping colors from blending.

In-process tip: Give the mold a little shake to even out the layer and tap out air bubbles.
Freeze again, this time for at least 30 minutes, though I sometimes leave it for an hour if I want the lines extra sharp.
3. Top With the Blue Layer
It’s time for the cool blue finish. The best way to get that bold blue look is with blueberries, fresh or frozen.
Best fruits for blue: Blueberries always work. Blackberries give you a deeper blue but can look almost purple.

Blending: Toss blueberries, sweetener, and a splash of water in your blender. Blend until fully smooth, adding water as needed to help it pour.

Blend until fully smooth, adding water as needed to help it pour.

Pouring without smudging: Spoon the blue fruit puree on top of the frozen white layer. Fill the molds to the top, but don’t overfill.

In-process tip: Add the popsicle sticks now. The blue layer helps them stand straight instead of leaning or falling.

Freeze the filled molds for at least four hours, or overnight if you have the time. The pops should be solid all the way through and easy to unmold after a quick rinse under warm water.

These steps make it easy to create festive, stripey treats that impress before you even take a bite. Each layer brings its own color and taste so every popsicle feels like a mini celebration, just in time for the 4th.
Tips for Perfect Popsicles Every Time
Nothing ruins a fun treat like popsicles that won’t come out of the mold or layers that turn into a tie-dye mess. I’ve made enough Fourth of July pops to know a few easy tricks that make a big difference. With these simple tips, you’ll get great-looking, easy-to-eat pops every time, without any fuss.
Chill Everything First
One trick that saves time is chilling your ingredients before you start. Cold yogurt and cold fruit blend up smooth and freeze faster. Popsicles set up better when everything starts off cold.
- Pop your fruit and yogurt in the fridge for at least 30 minutes before blending.
- Let your popsicle molds cool in the freezer for 10 minutes before adding any layers.
Clean Layers, No Color Bleed
We all want those clear, patriotic stripes. The secret is patience and a steady hand.
- Freeze each layer until it’s firm before pouring the next one.
- Use a small spoon or squeeze bottle to add each layer right where you want it.
- If you drip a little, wipe the inside of the mold with a damp paper towel before freezing. That keeps colors from smearing.
Popsicle Sticks That Stand Tall
Crooked sticks happen to the best of us, but a quick fix keeps them straight.
- If your mold has a lid, slide sticks into the slots after you add the last layer.
- If you’re using open molds or paper cups, cover them with a layer of foil. Poke the sticks through the foil to keep them upright while they freeze.
Speed Up Unmolding
There’s nothing worse than tugging at a stuck popsicle. A little warm water is all you need.
- Fill a bowl or the sink with warm (not hot) water.
- Dip the mold in for 10-15 seconds.
- Wiggle the stick gently, and your popsicle will slide right out.

Making Popsicles in Advance
Busy days call for make-ahead snacks. Popsicles are easy to prep ahead so you’re always ready for a crowd.
- Once frozen, take the popsicles out of the mold and wrap them in wax paper or parchment. Toss them in a zip-top bag and store in the freezer.
- This keeps the pops from sticking together and helps prevent freezer burn.
- Popsicles keep for up to two weeks, but I’ve never had a batch last that long at my house!
Quick Fixes for Common Problems
Even if things go sideways, you can save your pops.
- If layers blur together, call them “fireworks pops” and pretend it was on purpose.
- If a layer cracks, smooth it out gently with the back of a spoon before adding the next one.
- If sticks slide out, serve the pops in little cups with spoons. No one will mind.
With these tips, your popsicles will pop right out, look their best, and taste cool and creamy every time. Kids and adults will be lining up for these simple, festive treats.
Frequently Asked Questions About 4th of July Popsicles
I get a lot of questions every summer about these popsicles. People want to know if they can switch up the fruit, what to do if things get messy, or how long these treats keep in the freezer. Here are answers to the top questions I hear so you don’t have to guess.
Can I Use Different Fruit?
You sure can. The recipe is flexible. The red layer works with strawberries, raspberries, or even cherries if you want a deeper color. For the blue layer, blueberries give a nice shade, but blackberries work if you don’t mind a slight purple tint.
- Use what’s in season or sitting in your fruit bowl.
- Frozen fruit blends just as well as fresh.
- Try to keep a red, white, and blue theme for that classic look, but no one will complain if you swap things up.
Are These Popsicles Allergy Friendly?
They can be! Swap Greek yogurt for coconut milk or a favorite non-dairy yogurt to make the pops dairy-free. Double-check the labels on your ingredients if someone has food allergies.
- Use maple syrup instead of honey for babies under 12 months or a vegan option.
- The recipe skips nuts, gluten, and eggs, so it’s safe for many groups as written.
- Always check with your guests if you’re sharing.

How Long Do These Popsicles Take to Freeze?
The hands-on time is only about 15 minutes, but freezing each layer takes about 30 to 60 minutes. After you add the final blue layer, you’ll need at least 4 hours for everything to get solid. If you can, freeze overnight for pops that come out of the mold clean and firm.
- Plan ahead if you want sharp stripes.
- The layers don’t need to be frozen rock solid between steps, just firm enough to hold up the next layer.
What if I Don’t Have Popsicle Molds?
No mold, no problem. Use small paper cups or sturdy silicone muffin liners. You can even repurpose ice cube trays for mini popsicles.
- Cover cups with foil and poke sticks through to keep them upright.
- Silicone molds release popsicles easily but paper cups work fine for a casual party.
- Wooden sticks are easy to grab at a craft store.
How Do I Store Leftover Popsicles?
Once your pops are frozen solid, pop them out and wrap each one in wax paper or parchment. Store the wrapped popsicles in a freezer bag.
- This keeps them from sticking together.
- Wrapped popsicles store well for up to two weeks, but they rarely last that long in my house.
- Avoid plastic wrap, which can stick and pull off chunks of popsicle.
Can I Make These Popsicles Sugar-Free?
Yes, you can skip the sweetener or use a sugar substitute that works for you. Berries are naturally sweet, especially in summer, so taste the fruit layer before adding anything extra. Sometimes all you need is a little ripe fruit to do the job.
- Blend in a banana for creaminess and sweetness if you want to skip sugar altogether.
- Use unsweetened yogurt or coconut milk for the white layer.

How Do I Get Popsicles Out of the Mold Cleanly?
Don’t fight with stuck pops! Run the outside of the mold under warm water for 10-15 seconds. Wiggle the sticks gently, and the popsicles should slide right out. If they still won’t budge, give them another quick dip and try again.
- Avoid twisting or pulling too hard, or the sticks might slip out.
- Silicone molds are easier to work with than hard plastic ones.
My Layers Ended Up Swirled…Help!
If your popsicles come out a little swirled, just call them “firework pops.” Kids love the surprise look. To prevent blending, freeze each layer until it’s set before pouring the next. If you’re short on time and the colors run, they still taste great.
- Chill ingredients and molds before starting for sharper layers.
- Use a spoon or squeeze bottle for control.
These questions pop up every summer. I hope my answers make you feel ready to take on homemade popsicles with zero stress. If you have more questions, let me know and I’ll add them next time!

Fourth of July Popsicles
Ingredients
Red Layer:
- 1 cup strawberries or raspberries
- 1 tbsp honey or maple syrup
- 1-2 tbsp water if needed, for blending
White Layer:
- 3/4 cup Greek yogurt or coconut milk for a dairy-free option
- 1 tbsp honey or maple syrup
- 1/2 tsp vanilla extract
Blue Layer:
- 1 cup blueberries
- 1 tbsp honey or maple syrup
- 1-2 tbsp water if needed, for blending
Instructions
Blend the red layer:
- Blend strawberries (or raspberries) with honey and a little water until smooth. Fill popsicle molds 1⁄3 of the way. Freeze for about 30 minutes.
Prepare the white layer:
- Mix Greek yogurt, honey, and vanilla. Add this on top of the frozen red layer and freeze for another 30 minutes. This layer may need closer to an hour before frozen solid.
Blend the blue layer:
- Blend blueberries with honey and a little water. Pour on top of the white layer. Insert popsicle sticks and freeze for at least 4 hours.
Unmold & serve:
- Run the popsicle molds under warm water for a few seconds to release them easily.
Creative Variations for Busy Celebrators
Everyone loves a classic red, white, and blue popsicle, but sometimes you want a twist that matches your time crunch or picky eaters. I always look for ways to mix things up without making life more complicated. There are plenty of easy tweaks that add fun or help you use what’s already in your fridge. Here’s how you can personalize your popsicles and still keep it simple.
Fast Flavor Swaps
Changing the flavors is the quickest way to make your batch feel new. No need to hunt down rare fruit or special sweeteners.
- Mix up the fruit: Use whatever berries you have on hand—think blackberries for purple, fresh cherries for a deep red, or swap in diced peaches for a golden stripe.
- Go tropical: Mango or pineapple blended with yogurt make a sweet yellow or orange layer if you want a sunset vibe.
- Citrus zing: Add a splash of orange or lemon juice to boost brightness and make the flavors pop.
I try to use up what needs eating in my freezer or fruit bowl. That way, nothing goes to waste and snack time always feels fresh.
Kid-Friendly and Allergy-Safe Variations
Sometimes you need options for different allergies or taste buds, especially if you’re hosting a group.
- Dairy-free all the way: Coconut milk or any thick non-dairy yogurt works for the white layer. I like to try almond or oat yogurt for a smooth texture.
- No added sugar: Sweeten the layers with ripe banana instead of syrup or honey. You’ll get creaminess and a touch of natural sweetness.
- Hide extra fruit or veggies: Toss a chunk of avocado into the white layer for bonus creaminess. Add spinach to blueberry layers for a secret green boost (trust me, kids won’t notice).
These swaps fit picky eaters and food allergies without extra drama. I always double-check with guests, but these tricks pass the taste test every time.

Popsicles Without a Mold
Don’t let missing molds stop you. Any small, freezer-safe container can do the job.
- Paper cups: Pour your layers into 3-ounce cups, set them on a baking sheet, and stick a popsicle stick through the top.
- Silicone muffin liners: Perfect for making round pops that slide out easily.
- Ice cube trays: Mini pops are just right for little hands or snack-sized servings.
A bit of foil with a slit for the stick keeps things upright while freezing. I use whatever’s clean and nearby when I’m short on time.
Time-Saving Shortcuts
If you’re running late or don’t want to mess with three layers, you can still make festive pops.
- Two-layer pops: Skip the middle layer and alternate red and blue. They freeze faster and still look fun.
- Marbled pops: Lightly swirl fruit and yogurt layers together with a toothpick for a tie-dye effect. Less waiting between layers.
- Store-bought hack: Use ready-to-eat vanilla pudding for the white layer or pre-blended smoothies for color. Just layer and freeze.
Every shortcut keeps your freezer stocked with cool treats but saves precious minutes when you need them most.
Creative Toppings and Extras
Sometimes a small touch takes these pops over the top for parties.
- Sprinkle decorations: Dip unmolded pops in sprinkles or edible glitter for extra sparkle.
- Drizzle with chocolate: White or dark chocolate adds a tasty shell and holds extra toppings.
- Fruit chunks: Drop diced strawberries or blueberries straight into the mold for a surprise with every bite.
I love seeing the excitement when someone discovers a hidden strawberry or a chocolate drizzle. Little details make even the easiest recipes feel special.
With these variation ideas, anyone can put a personal spin on 4th of July popsicles. Easy mix-and-match tricks mean you’ll never get bored—even on your busiest days.

Final Thoughts
There’s nothing like a simple treat that makes your celebration pop. These red, white, and blue popsicles hit the sweet spot for busy days and hot summer afternoons. I love seeing the bright colors come together, knowing I spent just a few minutes in the kitchen and got something festive out of it.
If you try these popsicles, let me know how they turn out or what fun flavors you use. Share your photos and ideas in the comments or tag me on social media—I can’t wait to see your spin on this recipe.
Thanks for joining me. Save this post for next year, and don’t forget to share with a friend who needs an easy win in the kitchen. Happy Fourth, and keep cool!


Sarah Lee is an ER doctor and the creator of Laid Back Bites, where she shares simple, stress-free recipes for busy lives. Living on a farmette in Oklahoma with her husband, 4 horses and 4 cats, she combines her experience in a high-pressure career with a passion for easy, comforting meals. Her unique perspective brings a sense of balance and practicality to the kitchen, helping readers create delicious dishes without the stress.
For more fun summer treats try my:
 Homemade Dr Pepper Ice Cream Recipe: A Creamy Soda-Inspired Treat
 Irresistible Mexican Street Corn Dip: The Ultimate Party Starter