French silk pie has always been my absolute favorite dessert. There’s just something about that silky, rich chocolate filling topped with fluffy whipped cream that I can’t resist. My love for it runs so deep that one year, while I was working over Thanksgiving weekend, my husband surprised me by buying an entire French silk pie just for me. It was sweet… and also a little dangerous because I absolutely refused to share it with anyone! Let’s just say that pie and I had some quality alone time that weekend.
That’s what inspired these French silk pie cookies—a bite-sized, handheld version of my beloved dessert. They’ve got all the rich chocolatey goodness of the original but in a fun, portable cookie form. And yes, they’re so good you might find yourself keeping the whole batch to yourself too! But if you do decide to share, I promise they’ll be a huge hit. Let’s dive in!
Jump to RecipeTable of Contents
What Are French Silk Pie Cookies?

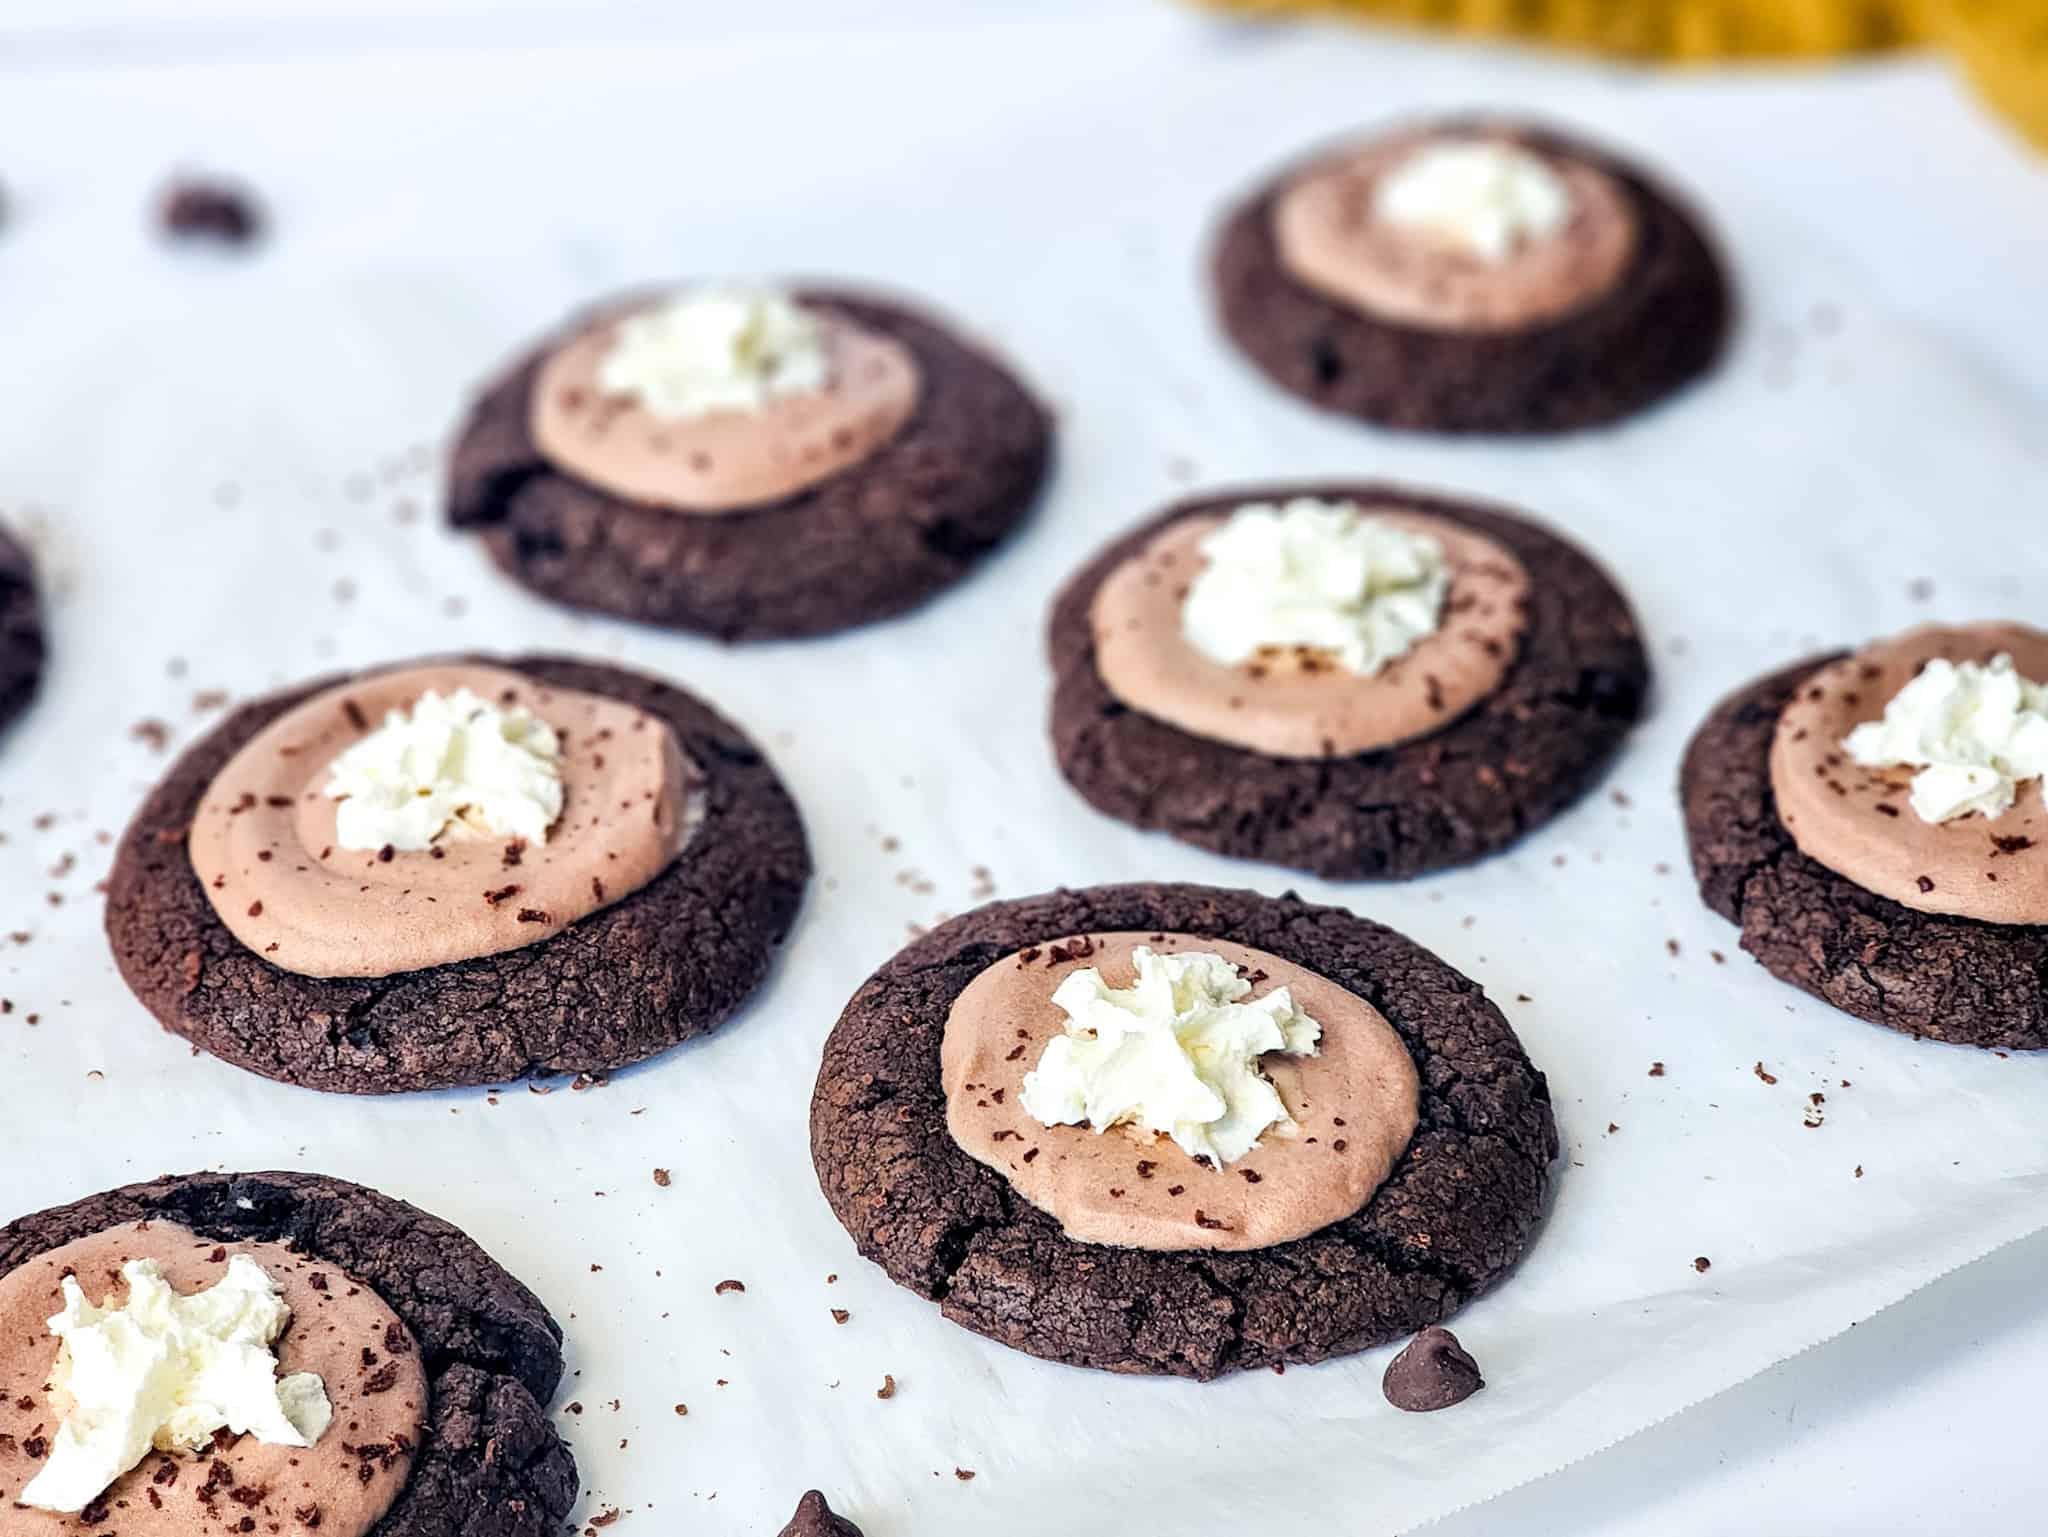
French silk pie cookies are the perfect mashup of pie and cookies. They feature a chewy oreo cookie crust, topped with a mousse-like chocolate layer inspired by the creamy filling of a French silk pie recipe. To finish, each cookie gets a dollop of whipped cream, a sprinkle of chocolate shavings, and optional chocolate curls for elegance.
These cookies are all about flavor and texture. The rich chocolate mousse pairs perfectly with the crunchy edges of the cookie, and the whipped cream adds a light, airy contrast. They’re easy to prepare, making them perfect for holidays, parties, or even a TikTok make challenge!
Why Are They Called French Silk Pie Cookies?

The name comes from the inspiration behind the cookie. French silk pie is known for its chocolate mousse-like silkiness and decadence. These cookies replicate that creamy filling in the form of a dollop of chocolate cream sitting on top of a cookie base. The result? All the creamy, dreamy chocolate silk flavor you’d expect from the pie, but with the portability and ease of cookies.
By combining the names “French silk pie” and “cookies,” you get a hybrid dessert that delivers on both fronts. It’s the dessert world’s version of a win-win.
What Makes Them Special?
French silk pie cookies aren’t just your average chocolate cookies—they’re layered with extra indulgence. Here’s why they stand out:
- A Unique Filling: Unlike a standard cookie, these feature a creamy chocolate mousse filling, giving them that signature French silk pie taste.
- Contrasting Textures: The base offers a satisfying chew, while the topping is soft and airy, mimicking whipped chocolate.
- Customizable: You can add toppings like whipped cream, chocolate shavings, or even mini chocolate chips to make them your own.
- Perfect Size: They’re small enough to enjoy as a snack but rich enough to satisfy any chocolate craving.
If you love desserts with bold chocolate flavor and crave a mix of creamy and chewy textures in one bite, these cookies hit the sweet spot. Whether you call them chocolate mousse cookies or chocolate pie cookies, one thing’s for sure—they’re ridiculously good.
Why You’ll Love This Recipe

- Easy but Fancy: With just a few steps, you’ll create cookies that look like they came straight from a bakery window.
- Rich Chocolate Flavor: From the Oreo base to the chocolate silk filling, every bite is packed with chocolatey goodness.
- Versatile and Customizable: Add chocolate chips, crushed nuts, or even a swirl of peanut butter to make them your own.
- Perfect for Special Occasions: These cookies shine on dessert tables and make great gifts.
Whether you’re trying to make the best French silk pie cookies or just craving something sweet, these cookies deliver the best results every time.
When it comes to easy, indulgent desserts, this French silk pie cookie recipe truly delivers. It’s not just a cookie—it’s a little chocolate masterpiece that blends rich flavors with playful textures. Whether you’re hosting a gathering or treating yourself after a long day, you’ll find a million reasons to fall in love with this recipe. Here’s why it’s a standout:
Ingredients Overview
When it comes to making French silk pie cookies, the ingredients you choose are just as important as how you prepare them. Every single component plays a unique role in building the cookie’s texture and flavor, as well as that irresistible creamy filling. Let’s break it down so you can whip these up with confidence.
Key Ingredients for the Cookie Base

The cookie base serves as the foundation for these chocolate pie cookies, and their success lies in carefully selected ingredients that bring flavor, texture, and structure together. Here’s what makes it special:
- Oreos: Crushed Oreos are the not-so-secret ingredient here. They add a slight crunch and a deep chocolatey richness that no other ingredient delivers. The chocolate creme from the Oreos also helps bind the base, making it extra tasty.
- Cocoa Powder: For that bold, intense chocolate flavor, unsweetened cocoa powder is a must. Dark cocoa powder amps up the richness, giving the cookie base a flavor profile similar to a decadent brownie.
- Leavening Agents: A mix of baking powder and baking soda creates just the right lift while maintaining the chewiness. This duo ensures the cookies hold their shape while baking without being too airy or cakey.
When combined, these ingredients create a sturdy but tender base that’s perfectly balanced to support the light and creamy filling.
Essential Components of the Chocolate Silk Filling
The chocolate silk filling is the showstopper that ties this dessert together. It’s all about smooth textures and rich flavors, so every ingredient has a purpose:
- Chocolate Pudding Mix: This shortcut ingredient thickens the filling while adding a velvety texture that mimics the luxurious feel of a proper French silk pie. Plus, it brings that familiar creamy chocolate flavor, which pairs beautifully with the base.
- Heavy Cream: Heavy cream is whipped into the pudding mix to make it airy, light, and mousse-like. Its high fat content ensures every bite of the filling is indulgent and rich.
- Melted Chocolate: For depth and an extra layer of chocolatey goodness, melted semi-sweet chocolate is whisked in. It balances the sweetness of the pudding mix and offers a polished, silky finish.
To top it all off, whipped cream provides the final touch. Its light and fluffy texture contrasts with the richer filling and adds a bit of sweetness without overpowering the flavors. Think of it as the cherry on top—except it’s creamy, dreamy whipped perfection.
With these carefully chosen ingredients, you’ll have everything you need to bring these French silk pie cookies to life. Each component works together to create the perfect balance of textures and flavors in every bite.
Step-by-Step Instructions
Making French silk pie cookies is easier than you might think. Follow these straightforward steps to whip up a batch that tastes like a dream. From preparing the cookie dough to adding the silky filling, every step plays a role in achieving that perfect balance of flavors and textures.
Preparing the Cookie Dough
The cookie base starts with crushing Oreos and mixing simple ingredients into a dough that’s rich yet easy to work with. Here’s how to do it:
Crush the Oreos: Toss about 10 Oreos into a food processor or blender. Pulse until they’re finely ground, almost like sand. No food processor? No problem—put them in a sturdy zip-top bag and crush them with a rolling pin.

Mix Dry Ingredients: In a bowl, combine the crushed Oreos, flour, cocoa powder, cornstarch, baking soda, baking powder, and a pinch of salt.

Whisk until everything is evenly mixed.

Combine Wet Ingredients: In a separate bowl, cream softened butter with brown sugar, vanilla extract, and an egg.

Mix it smoothly.

Use a hand mixer for a smoother result, but a spoon works, too, if you prefer a little extra stirring.

Form the Cookie Dough: Gradually add the dry mix to the wet ingredients. Stir until a soft, chocolatey dough forms. It should be pliable but not sticky. Scoop out pieces of dough (about 1 inch in size) and roll them into balls. Press each ball slightly flat—this will make room for the filling later.

Stir until a soft, chocolatey dough forms.

Flattening the dough is key. It creates a sturdy surface for the chocolate silk topping, so don’t skip this step!

Baking the Cookies

Now, it’s time to bake the cookie bases and set the stage for that creamy filling.
- Preheat the Oven: Set your oven to 350°F and get your baking sheet ready with a layer of parchment paper.
- Bake the Cookies: Place the flattened dough balls on the tray, spacing them about 2 inches apart. Bake for about 10 minutes or until the edges look slightly firm.
- Shape the Divots: The magic happens as soon as the cookies come out of the oven. Using the bottom of a glass or cup, gently press the center of each cookie to create a small indent. This will hold your filling later. Remember, it’s easier to do this while the cookies are still warm!
Careful not to overbake—these cookies should stay soft and chewy, not hard and crunchy.
Making the Chocolate Silk Filling

The filling is where the magic happens. Smooth, rich, and creamy, it’s the centerpiece of these cookies.
- Combine Ingredients: In a mixing bowl, add the pudding mix, milk, powdered sugar, melted chocolate, heavy cream, and vanilla extract.
- Blend to Perfection: Grab your hand mixer and beat the ingredients on low to medium speed. Mix until the texture turns thick and creamy. This should take just a few minutes.
- Get That Silky Texture: For a smoother result, scrape the sides of the bowl as you mix to avoid lumps. If needed, chill the filling in the fridge for 5–10 minutes to firm it up slightly before assembly.

The key here is to mix just enough—not overdoing it prevents the filling from becoming too airy or grainy.
Assembling and Serving the Cookies

Now for the fun part—putting it all together. This step is straightforward, and the results are stunning:
Fill the Cookies: Once the cookie bases have cooled to room temperature, scoop a generous dollop of chocolate silk filling into each cookie’s divot. A small spoon or piping bag works well for precision.

Add the Toppings: Top each cookie with a swirl of whipped cream. For an extra touch, add chocolate shavings, mini chocolate chips, or a sprinkle of cocoa powder.

Serve and Impress: Arrange the cookies on a platter for a picture-perfect presentation. Want to elevate them even more? Serve cold with a drizzle of melted chocolate around the plate.

These cookies are best enjoyed fresh, but they can be stored in the fridge for a couple of days. Who wouldn’t want a cookie that’s both delicious and elegant?
Tips and Tricks for Perfect French Silk Pie Cookies
French silk pie cookies are nothing short of extraordinary, but as with any dessert, a few slip-ups can impact their final look, texture, and flavor. Let’s cover some practical tips to take your cookies from good to absolutely show-stopping.
Ensuring the Right Cookie Texture
Getting the right cookie base for these chocolate pie cookies is all about precision and technique. Nobody wants cookies that are dry, dense, or just plain heavy. Here’s how to nail it:
- Measure Ingredients Accurately: Baking is a science, so use measuring cups and spoons for precise amounts. Too much flour or cocoa powder can dry out the dough, while skimping on the wet ingredients can make it crumbly. When scooping flour, lightly fluff it, scoop into your cup, and level it off with a knife to avoid packing.
- Don’t Overmix the Dough: Less is more when you’re combining your wet and dry ingredients. Stir just until the dough comes together. Overmixing activates the gluten, making the cookies tougher and less airy.
- Chill the Dough (Optional): If your kitchen is warm, let the dough rest in the fridge for 10–15 minutes. This helps control spreading during baking and gives a slightly chewier texture.
- Keep an Eye on Baking Time: Cookies can overbake in a flash. Start checking them at the 9-minute mark. They should look just set around the edges but might still feel soft in the middle. Remember, they firm up as they cool.
By sticking to these tips, you’ll create a tender, chewy cookie base that perfectly supports the creamy filling.
Achieving a Creamy and Smooth Filling
The chocolate silk filling is the star of this dessert, so it’s essential to get the texture and flavor just right. Nobody loves lumpy or grainy mousse! Try these tips for the silkiest results:
- Melt Chocolate Evenly: When melting chocolate chips, use low and slow heat. A microwave works just fine—heat in 15-second bursts, stirring in between, until smooth. If it overheats, it can seize and turn grainy. Stirring constantly ensures the chocolate melts evenly, like a dream.
- Use Cold Heavy Cream: For whipping, the cream needs to be cold to hold that airy texture. Pop it in the fridge before you start, and keep your bowl and whisk cold for extra insurance.
- Incorporate Ingredients Gradually: When mixing the filling, don’t just dump everything in at once. Start with the pudding mix and milk before adding the chocolate, sugar, and cream. Gradual mixing ensures everything blends smoothly without overbeating.
- Whip to the Right Consistency: The filling should be thick yet light, similar to chocolate mousse. Beat it just until soft peaks form and it holds its shape when scooped. Overmixing can cause it to deflate, leaving you with a dense, unappealing texture.
- Chill If Necessary: If the mixture feels too runny, refrigerate it for 5–10 minutes. This firms it up slightly, making it easier to pipe or scoop neatly onto the cookies.
Mastering these steps will give you a filling that’s velvety smooth, full of flavor, and worthy of the dessert’s name.
Variations to Try
One of the best parts about French silk pie cookies is how customizable they are. While the classic recipe is delightful, experimenting with fillings and toppings can take these cookies to a whole new level. Here’s how you can switch things up to create unique versions of this dessert that both you and your guests will love.
Experimenting with Different Fillings
Why stick to just chocolate when there are so many other flavors to explore? Swapping out the traditional chocolate silk filling for something new can add a unique twist to your cookies. Here are some ideas to try:
- Peanut Butter Mousse: Blend cream cheese, heavy cream, powdered sugar, and creamy peanut butter for a light but nutty topping. It pairs incredibly well with the cocoa-rich cookie base. Think of it as a Reese’s-inspired treat!
- White Chocolate Silk: Melt white chocolate chips and fold them into whipped cream for a luscious, velvety filling. The sweetness and creaminess will contrast beautifully with the darker cookie base.
- Salted Caramel Cream: Whip together caramel sauce, cream cheese, and whipped cream, then stir in a pinch of sea salt. The salty-sweet combo adds depth and richness.
- Mint Chocolate Cream: Add peppermint extract to the chocolate silk filling or swap it with a green-tinted mint mousse for a fresh, vibrant flavor similar to a thin mint cookie.
These variations allow you to reinvent the dessert for different occasions or to match your cravings. Whether you’re in the mood for nutty, caramel, or minty flavors, there’s a filling for you.
Adding Toppings for Extra Flair
Once your cookies are filled, toppings can elevate them even further. A simple garnish can add both flavor and texture in just seconds. Here are some easy, crowd-pleasing ideas:
- Chocolate Shavings: Use a vegetable peeler to create delicate curls from a chocolate bar. Sprinkle these on top for a touch of elegance and a bit of crunch.
- Caramel Drizzle: Warm up caramel sauce and drizzle it over the filling for extra sweetness and a gooey, sticky texture. Bonus points if you use salted caramel!
- Chopped Nuts: Crushed pecans, almonds, or peanuts can add a satisfying crunch that balances the silky filling. Toast them beforehand for even more flavor.
- Mini Marshmallows: Add a few mini marshmallows and briefly broil the cookies for a s’mores-inspired twist. The gooey marshmallows and chocolate filling are a match made in dessert heaven.
- Crushed Cookies or Candy: Crumbled Oreos, graham crackers, or even crushed candy bars (like Snickers or KitKat) can add new textures and flavors.
The great thing about these additions is that they’re so versatile. Have kids helping? Let them customize their own cookie toppings like an edible art project. Hosting guests? Make an assortment topped with a mix of fancy garnishes to impress.
No matter how you mix and match, these variations are bound to add flair and flavor that keep everyone coming back for more. So go ahead! Experiment a little—your taste buds will thank you.
Storage and Make-Ahead Tips

Planning ahead or having leftovers doesn’t mean sacrificing the deliciousness of your French silk pie cookies. Here’s how to store and prep these chocolatey treats for maximum freshness and ease.
Storing Baked Cookies and Filling
Made too many cookies? No problem! Proper storage keeps them fresh and ensures the filling stays creamy and flavorful.
- The Cookies: Store baked cookie bases in an airtight container at room temperature for up to 3 days. If you live in a humid area, refrigerating them may be better to maintain the texture. For longer storage, freeze them. Wrap each cookie in plastic wrap and place them in a freezer-safe bag. They’ll stay perfect for up to a month.
- The Filling: Keep the chocolate silk filling in an airtight container in the fridge. It’s best used within 3–4 days to maintain its creamy texture. If the filling thickens too much, whisk in a splash of cold heavy cream before using it. Do not freeze the filling, as it can separate and lose its silky consistency when thawed.
Tip: If the filling is already piped into the cookies, store the assembled cookies in the fridge. Keep them in a single layer, covered with plastic wrap, to prevent smudging the filling.
By following these steps, you can ensure your chocolate pie cookies taste just as good on day three as they do fresh out of the oven.
Prepping in Advance for Busy Schedules
Pressed for time? Breaking the recipe into steps makes it manageable without sacrificing flavor or quality. Here’s how you can make this recipe fit your schedule:
- Make the Cookie Dough Ahead of Time: Prepare the dough and form it into balls as instructed. Flatten slightly and freeze them raw. Arrange the dough balls on a parchment-lined baking sheet, freeze until solid, then transfer them to a freezer bag. When ready to bake, pop the frozen dough directly into the oven. Add an extra 2–3 minutes to the baking time.
- Prepare the Filling Early: Whip up the chocolate silk filling a day in advance and store it in the refrigerator. Give it a quick mix before assembling the cookies to restore its creamy consistency.
- Assemble When Needed: Don’t add the filling and toppings until you’re ready to serve. This keeps the cookies fresher and prevents the whipped cream from weeping.
These small adjustments make it easy to whip up a batch without juggling every step at once. Whether you’re preparing for a party or tackling a packed schedule, these tips keep things stress-free.

French Silk Pie Cookies
Equipment
- 9×11 baking sheet
- Parchment Paper
- Hand Mixer
- 1 inch scooper
Ingredients
Cookie Ingredients:
- 10 oreos
- 1 ¼ cup all purpose flour
- 1 tablespoon cornstarch
- ¼ cup dark cocoa powder
- ½ teaspoon baking soda
- ¼ teaspoon baking powder
- ¼ teaspoon salt
- ½ cup brown sugar
- 1 egg
- 1 teaspoon vanilla extract
Chocolate Silk Filling:
- 2 tablespoons chocolate pudding mix
- ½ cup milk
- ¾ cup heavy cream
- ¼ cup powdered sugar
- 1 teaspoon vanilla extract
- 3 tablespoons chocolate chips melted
Whipped Cream
Instructions
- Preheat the oven to 350 degrees Fahrenheit. Prepare a baking sheet with parchment paper.
- In a food processor or blender, add the oreos and pulse until finely crushed.
- In a mixing bowl add the crushed oreos, cocoa powder, flour, cornstarch, baking soda, baking powder and salt. Whisk together these dry ingredients.
- In a separate bowl, add the softened butter, sugars, egg and vanilla extract. Mix together until creamy.
- Pour the dry ingredients into the wet ingredient bowl and fold everything together until a cookie dough forms.
- Use a scooper to create large cookie dough balls and place on the parchment covered baking sheet about 2 inches apart from each other. Flatten slightly.
- Bake in the oven for 10 minutes.
- While the cookies are baking, make the whipped filling. Add the milk, heavy cream, pudding mix, powdered sugar, vanilla and melted chocolate in a bowl all at once.
- Use a hand mixer to blend on low to medium speed until the chocolate mixture becomes a thick cream.
- When the cookies are done baking, immediately use the bottom of a cup or measuring cup to flatten the center of each cookie. This creates a divot for the pie-like filling to sit in later. Let them cool for 15 minutes.
- Once the cookies aren’t too hot anymore, scoop a large spoonful of the chocolate cream filling in the center of each cookie.
- Top each with a squirt of whipped cream and enjoy!
Why These Cookies Are the Best
These French silk pie cookies combine everything you love about a decadent pie with the convenience of cookies. With their rich chocolate filling, airy whipped cream, and chewy oreo cookie base, they’re perfect for any special occasion or everyday treat. Whether you call them chocolate mousse cookies, chocolate pie cookies, or the best Crumbl French silk pie cookies, one thing is clear—they’re irresistible!
Hope you like this recipe, you may also like:
- Quick and Easy Cinnamon Swirl Banana Bread
- Ultimate Sausage Gravy Biscuit Casserole Recipe for Busy Mornings
- Strawberry Waffles – Fluffy Homemade Recipe
Sarah Lee is an ER doctor and the creator of Laid Back Bites, where she shares simple, stress-free recipes for busy lives. Living on a farmette in Oklahoma with her husband, 4 horses and 4 cats, she combines her experience in a high-pressure career with a passion for easy, comforting meals. Her unique perspective brings a sense of balance and practicality to the kitchen, helping readers create delicious dishes without the stress.
 Chocolate Raspberry Cupcakes with Raspberry Buttercream Frosting: Quick and Easy Recipe for Busy Bakers