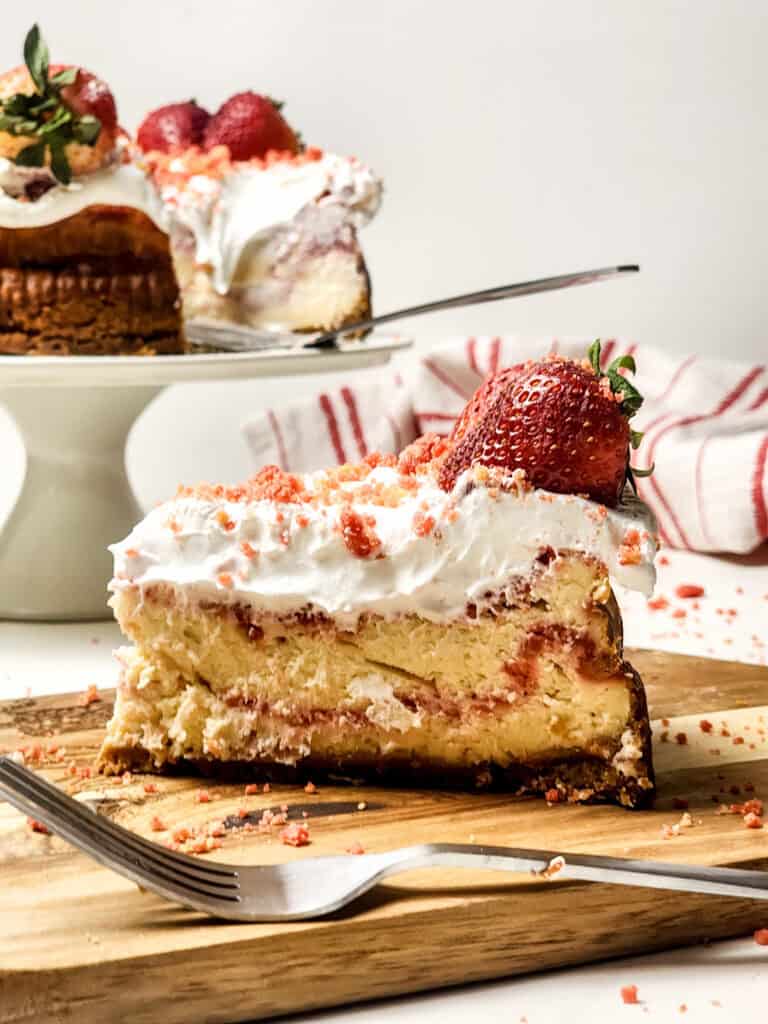
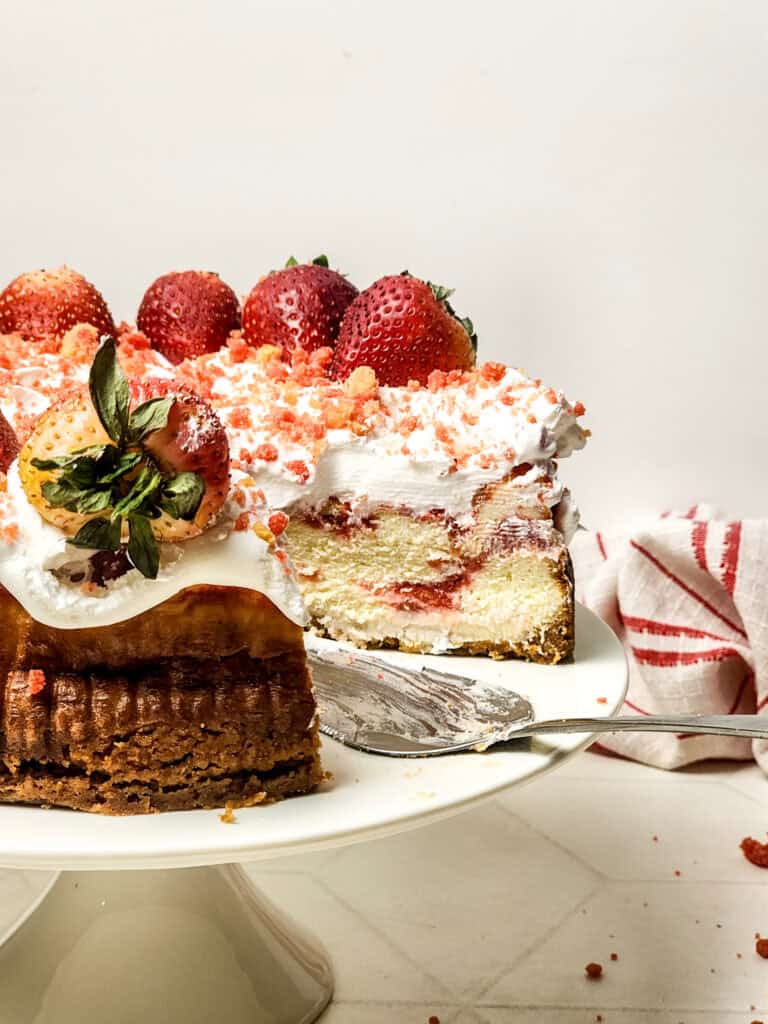
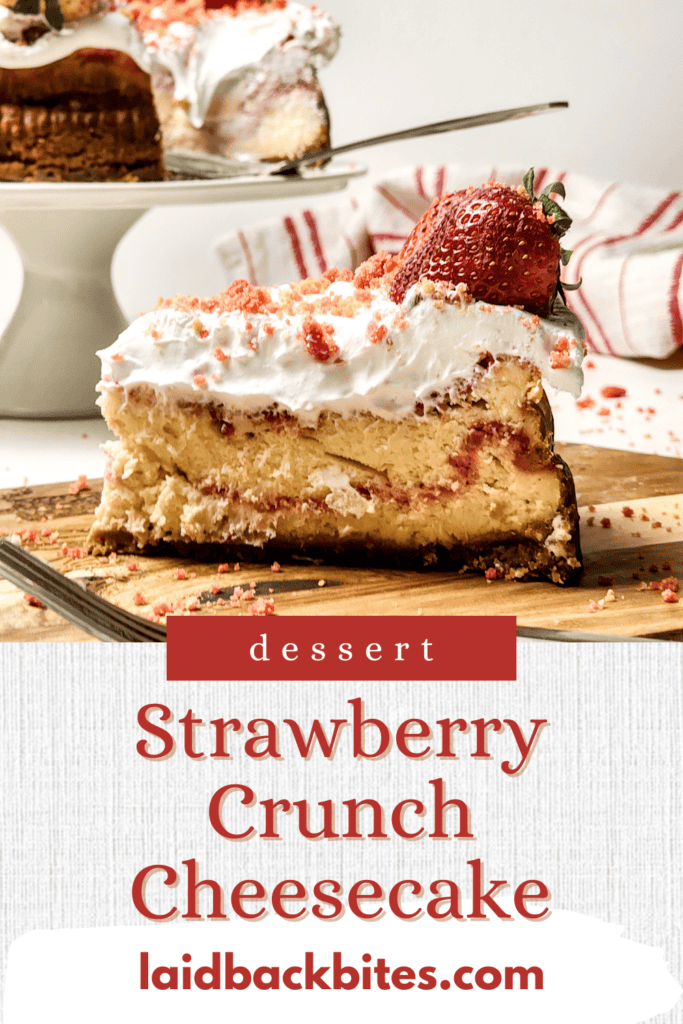
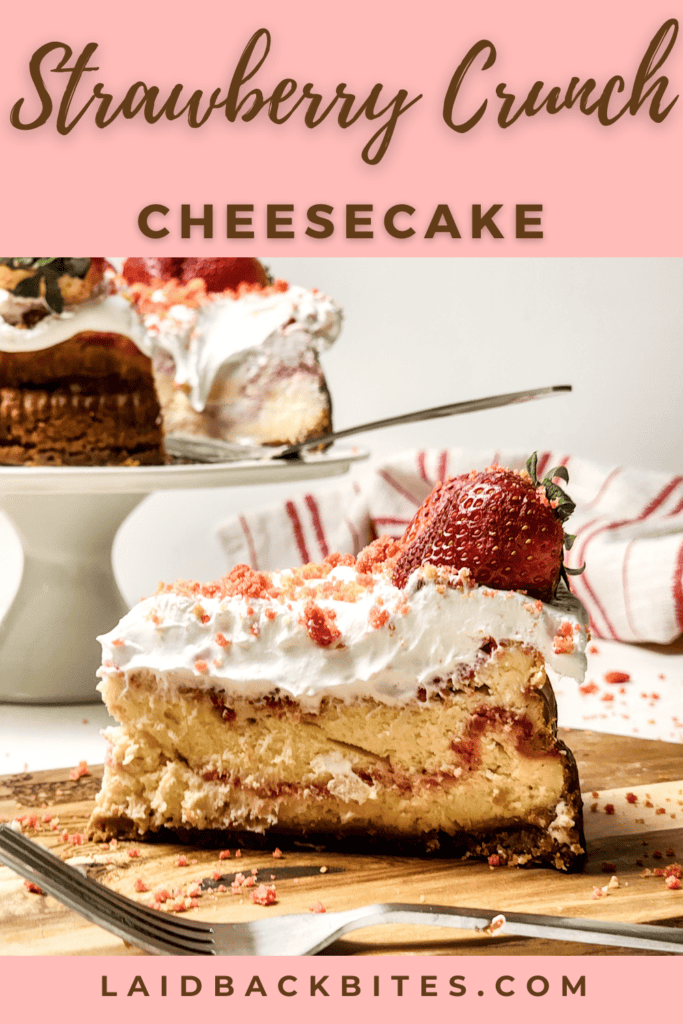
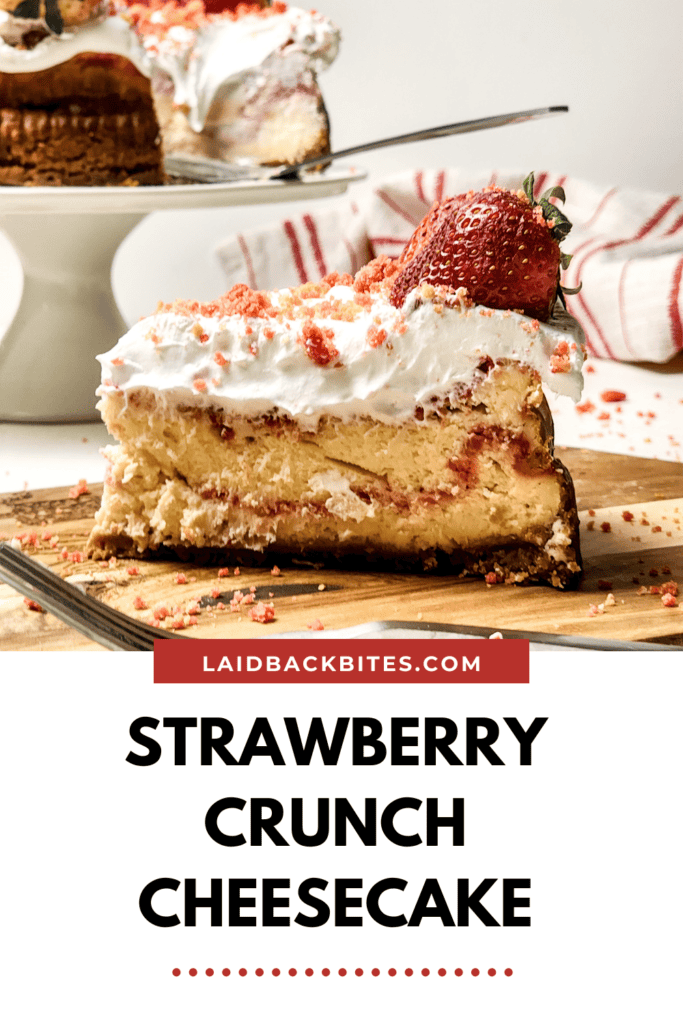
I’m so excited to share one of my all-time favorite desserts with you—Strawberry Crunch Cheesecake! If you’ve ever loved those strawberry shortcake ice cream bars, imagine that in cheesecake form. It’s got a buttery golden Oreo crust, a creamy cheesecake filling, and the most amazing crunchy strawberry topping.
The best part? It’s easier to make than it looks! With simple ingredients like melted butter, fresh strawberries, and whipped cream, you’ll have a dessert that’s perfect for any special occasion—or just because you’re craving something sweet. Let’s grab our springform pans and get started!
Jump to RecipeTable of Contents
Why You Should Make This Recipe
There are so many reasons this Strawberry Crunch Cheesecake should be at the top of your dessert list! Here’s why I love it—and why you will too:
- It’s a Crowd-Pleaser: Whether you’re making it for a birthday, a holiday, or just a regular weekend, this cheesecake always gets rave reviews. The sweet strawberry flavor and crunchy topping make it irresistible!
- Simple Ingredients, Big Flavor: You don’t need anything fancy to make this recipe. With basics like golden Oreos, cream cheese, and fresh strawberries, you can create a dessert that tastes like it came from a bakery.
- Easy to Follow: Even if you’re new to baking cheesecakes, don’t worry! I’ll walk you through step-by-step instructions so you’ll know exactly what to do.
- Perfect for Any Occasion: This cheesecake is beautiful enough for a special occasion but easy enough to make just because. Plus, it stores well in an airtight container, so you can enjoy leftovers (if there are any!).
- A Nostalgic Twist: If you grew up loving strawberry shortcake ice cream bars, this dessert brings back all those sweet childhood memories—only better, because it’s homemade!
So, if you’re looking for a show-stopping dessert that’s easy, delicious, and a little bit nostalgic, this Strawberry Crunch Cheesecake is the one. Let’s make some magic in the kitchen!
What You’ll Need to Make Strawberry Crunch Cheesecake
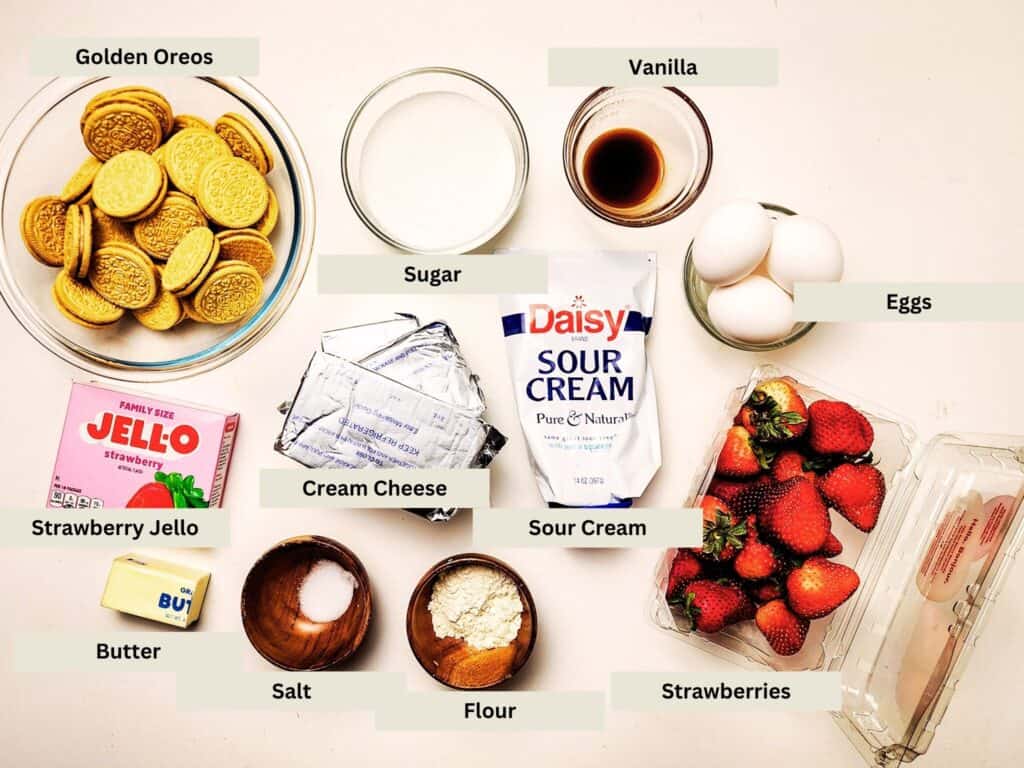
Before we dive in, let’s go over everything you’ll need. Trust me, having everything ready will make this super easy!
- For the Crust: Golden Oreos and melted butter are all you need to make the perfect base for this cheesecake. A springform pan lined with parchment paper helps it come out clean.
- For the Filling: Cream cheese (make sure it’s at room temperature), sour cream, eggs, sugar, and vanilla extract come together to create the creamiest cheesecake filling.
- For the Topping: Crushed golden Oreos, strawberry jello mix, and a little melted butter combine for that crunchy strawberry topping we all love.
- Extra Goodies: Fresh strawberries, whipped cream, and a sprinkle of strawberry crunch topping to decorate the cheesecake and make it look amazing.
Gathering the Right Equipment
Making a flawless strawberry crunch cheesecake doesn’t just rely on the ingredients or technique; you need the right tools to bring it all together. Having the proper equipment ensures your cheesecake bakes evenly, releases easily, and looks stunning. Let’s break down the essentials that will make your baking experience smooth and stress-free.
The Must-Have Springform Pan
At the center of any great cheesecake recipe is the springform pan. This pan has a removable outer ring that makes releasing the cheesecake a breeze. For this recipe, you’ll need a 10-inch springform pan. Its depth and structure ensure your delicate dessert retains its shape without crumbling during removal. If you don’t already own one, this is the tool that will take your desserts to the next level.
Parchment Paper for a Clean Finish
Using parchment paper might seem like a small step, but it makes a huge difference. Lining the bottom of your springform pan with parchment ensures your crust won’t stick, giving you a clean and professional-looking base. Trust me; peeling off bits of cheesecake crust from the pan is the last thing you want after all your hard work.
Mixing Bowls and Spatulas
You’ll need a variety of mixing bowls—smaller ones for ingredients like melted butter and larger ones for mixing the filling. Bowls with a non-slip base are especially useful, keeping everything steady while you work. Don’t forget flexible rubber spatulas for scraping every last bit of batter and making sure nothing goes to waste. A sturdy spatula is your best friend when folding ingredients or spreading that creamy filling.
A Hand Mixer for a Smooth Batter
Consistency is key when it comes to cheesecake fillings, and that’s where a hand mixer steps in. A high-quality hand mixer will blend your cream cheese, sugar, and eggs effortlessly, resulting in a silky-smooth batter with no lumps. While stand mixers are a great alternative, a hand mixer often provides the control needed for a recipe like this.
Large Roasting Pan for the Water Bath
A 9×13 roasting pan serves a crucial role in cheesecake success. Used as a water bath, it helps bake the cheesecake evenly and prevents cracks by maintaining a consistent temperature in the oven. Place your springform pan into this larger pan and add hot water—it’s the secret weapon for that creamy, crack-free texture.
Cooling Rack for Proper Airflow
Once baked, your cheesecake needs to cool properly to avoid sogginess or condensation. A wire cooling rack ensures air circulates around the pan, preventing a damp crust. It’s a simple yet essential step in achieving the perfect cheesecake texture.
Bonus Tools to Consider
If you’re all about making things easier, you might also want to stock up on these helpful extras:
- A digital kitchen scale for precise ingredient measurements.
- Measuring cups and spoons (especially for liquids like vanilla extract).
- A sieve or fine mesh strainer for sifting flour to avoid unwanted lumps.
Once you’ve got everything ready, we’ll jump into the step-by-step instructions. Let’s make this dessert come to life!
Step-by-Step Instructions for Strawberry Crunch Cheesecake
Now that we have everything ready, it’s time to bring this delicious dessert to life. Don’t worry—it’s easier than it looks, and I’ll guide you every step of the way!
1. Prepare the Crust
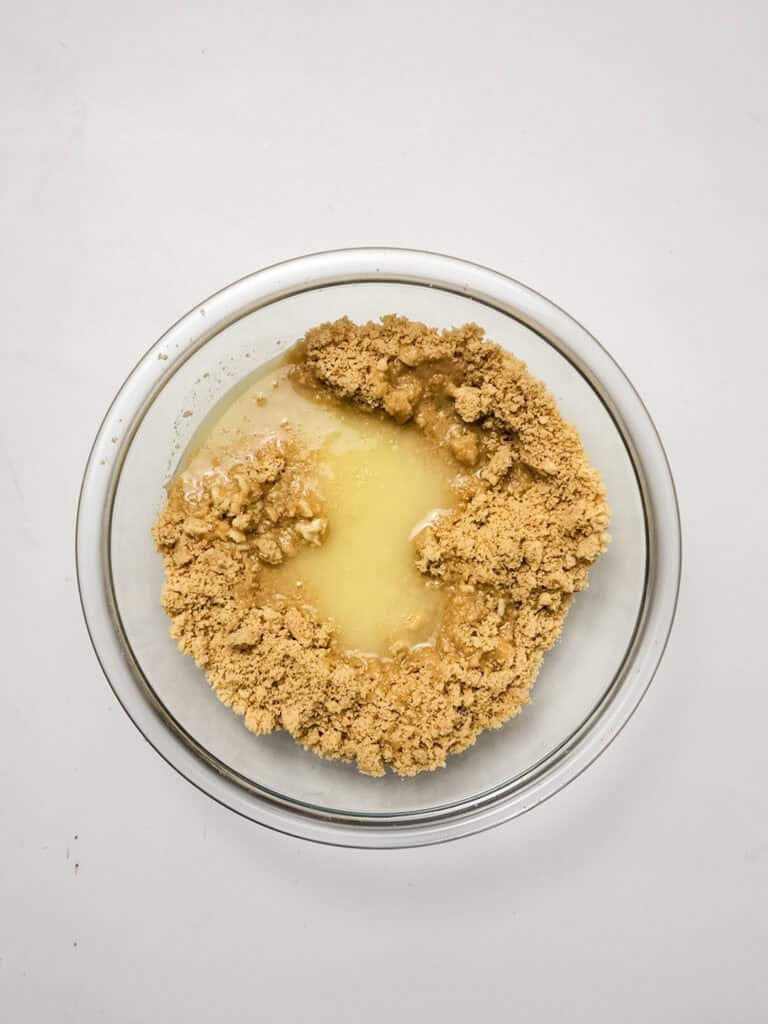
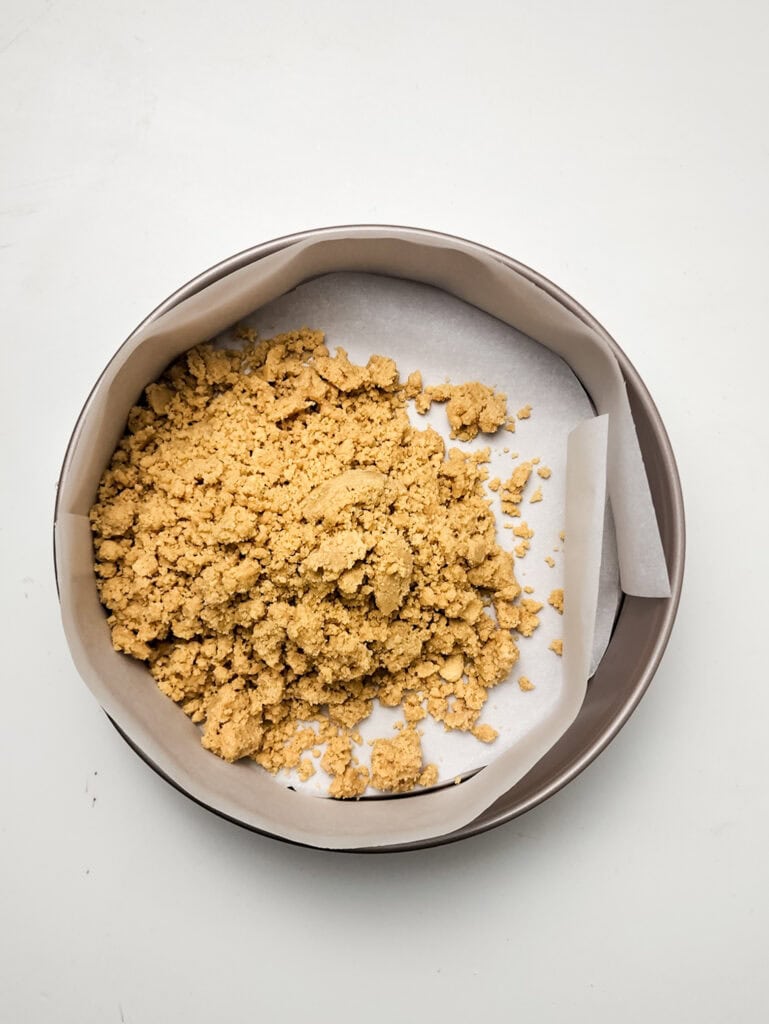
- Crush about 30 golden Oreos into fine crumbs. You can use a food processor or place them in a zip-top bag and crush them with a rolling pin.
- In a medium bowl, mix the crushed cookies with 5 tablespoons of melted butter until it looks like wet sand.
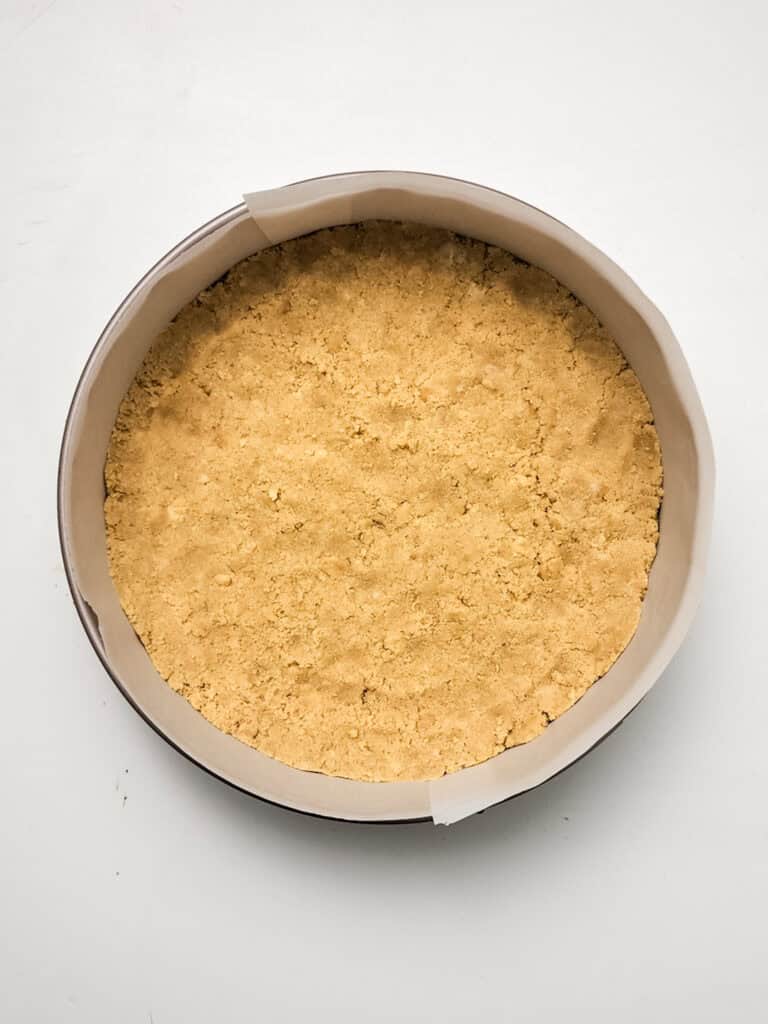
- Press the mixture evenly into the bottom of a 10-inch springform pan lined with parchment paper. Use the back of a spoon to pack it tightly.
- Bake at 325°F for 8-10 minutes. Let the crust cool completely while you prepare the filling.
2. Make the Cheesecake Filling
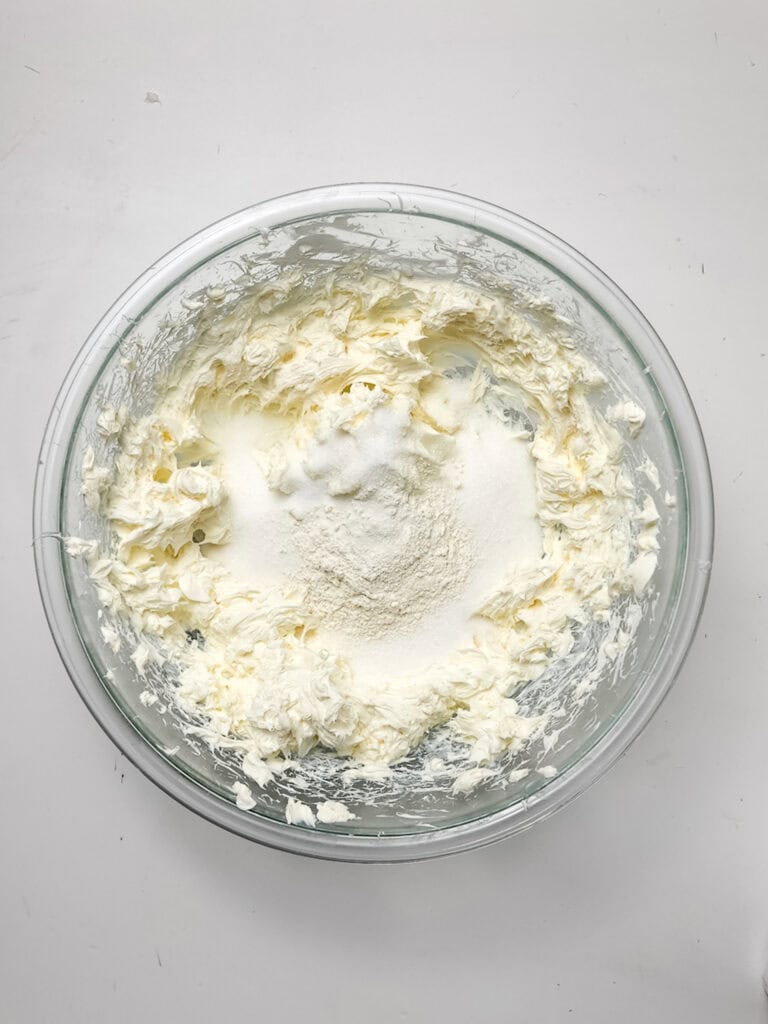
- In the bowl of a stand mixer or with a hand mixer, beat 24 ounces of softened cream cheese on low speed until smooth.
- Add 1 cup of sugar, ½ teaspoon of salt, and 1 ½ tablespoons of flour. Mix until combined, scraping the sides of the bowl as needed.
- Add 4 eggs, one at a time, mixing on low speed after each addition.
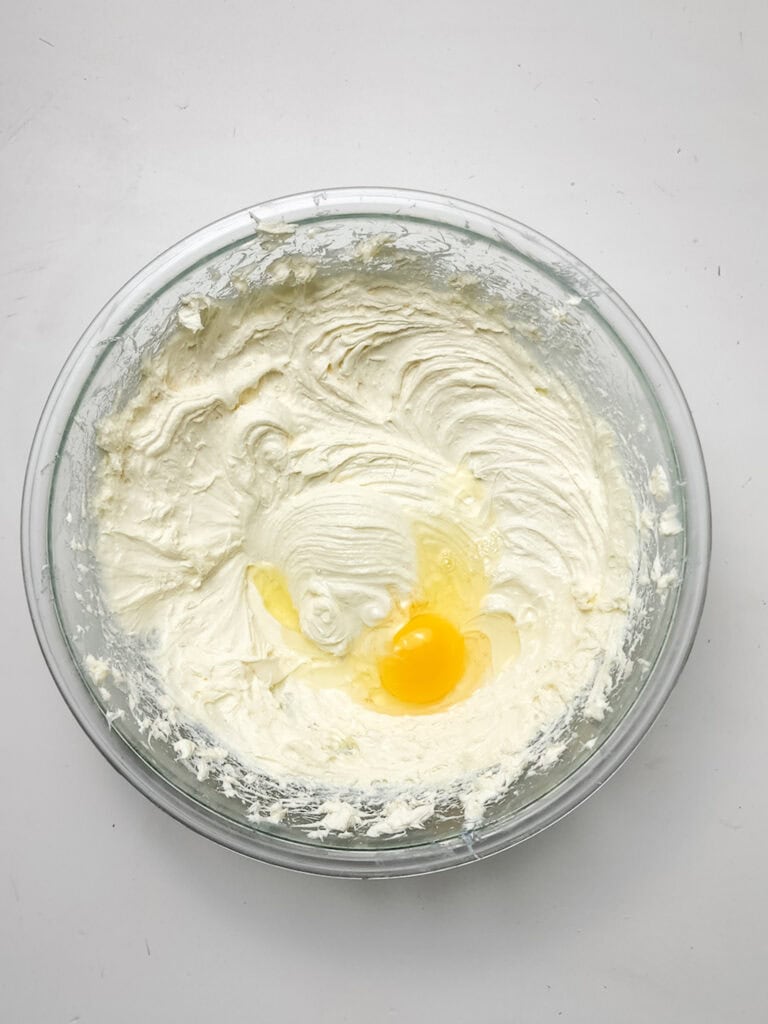
- Stir in 1 tablespoon of vanilla extract and ½ cup of sour cream until the mixture is creamy and smooth.

3. Make the Strawberry Crunch Topping
- In a separate bowl, combine 15 crushed golden Oreos, 2 ounces of strawberry jello mix, and 3 tablespoons of melted butter. Mix until crumbly.
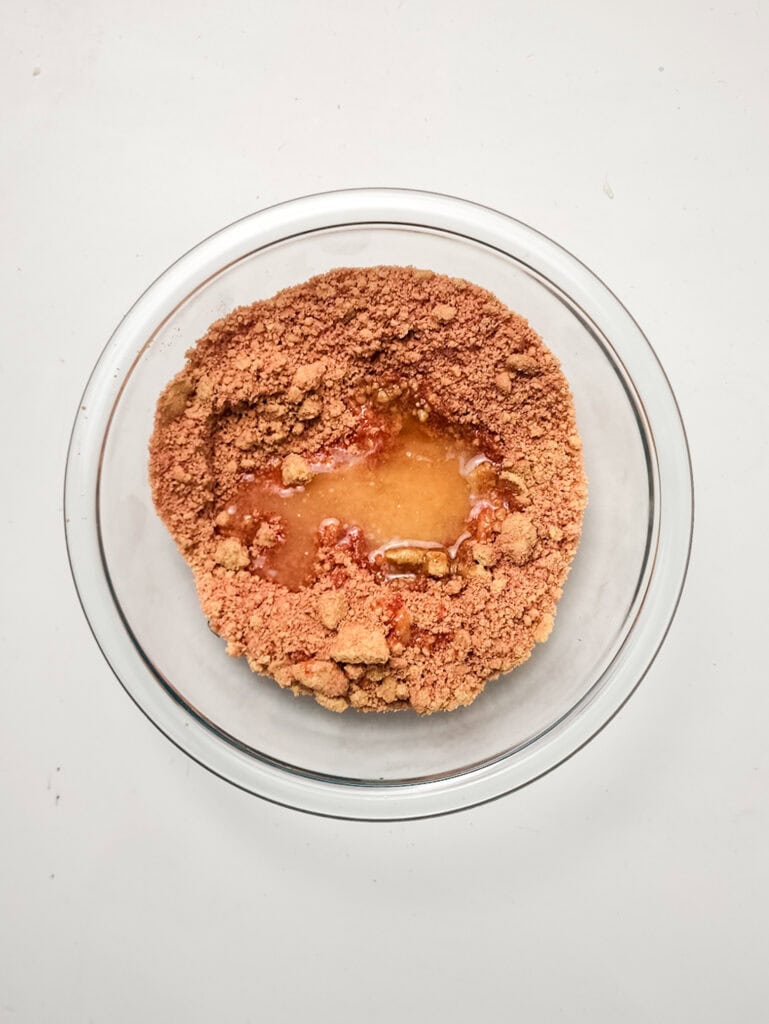
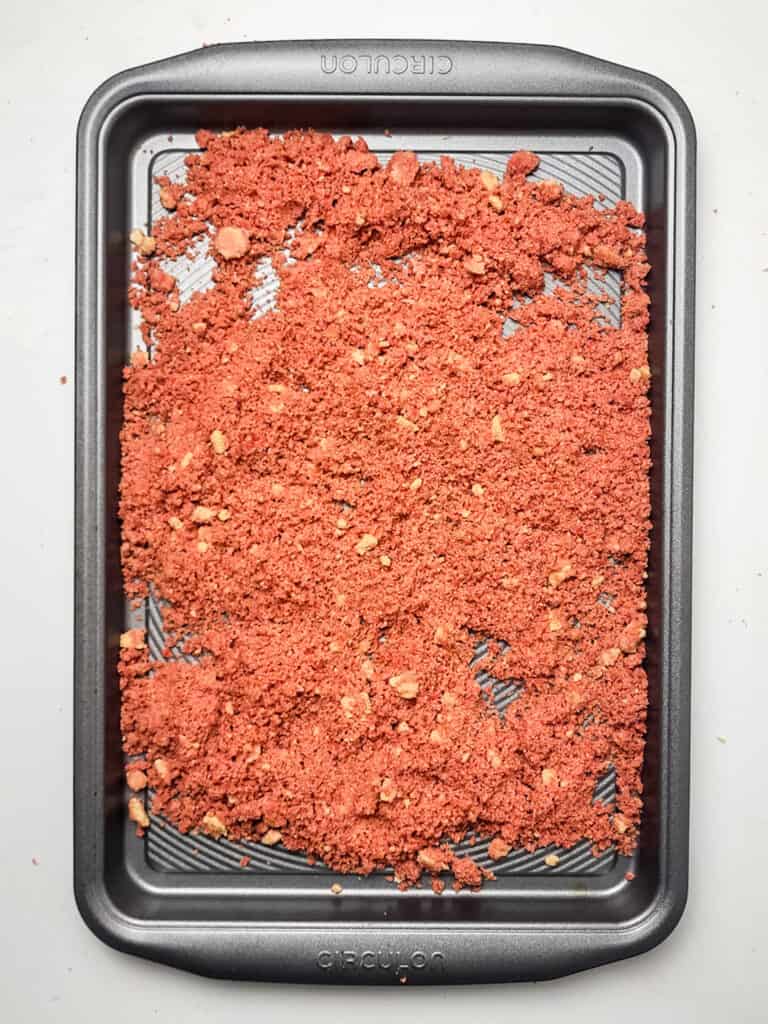
- Spread the mixture onto a parchment-lined baking sheet and bake at 350°F for 5 minutes. Let it cool completely to get that perfect crunch.
4. Assemble the Cheesecake
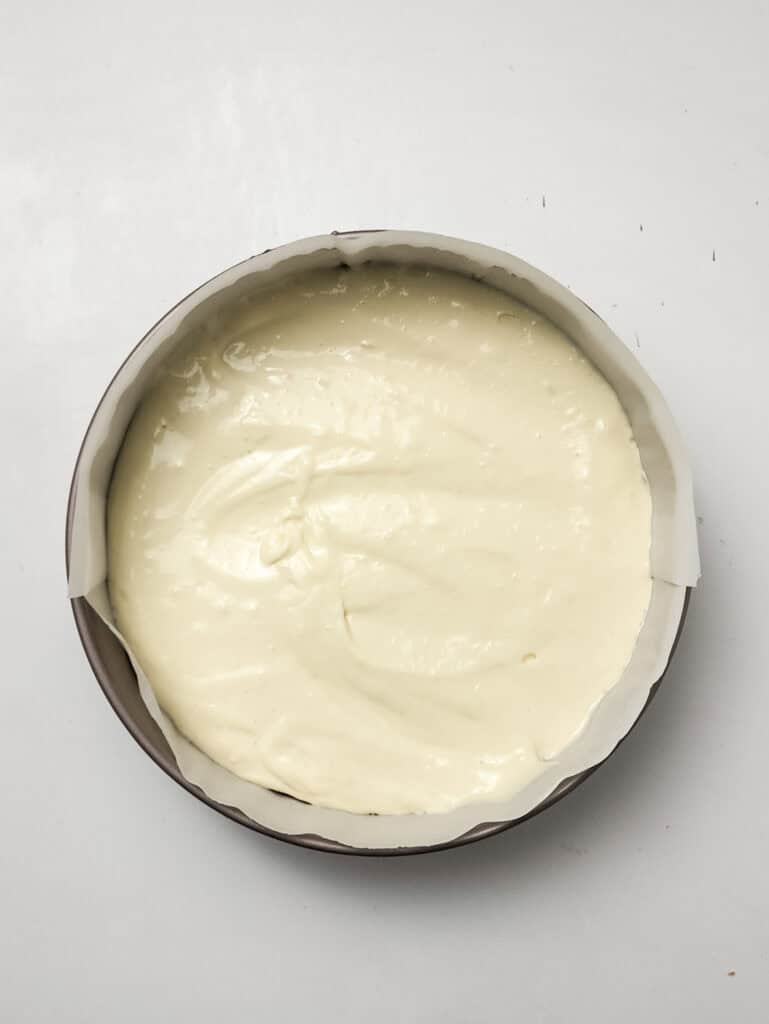
- Pour half of the cheesecake filling over the cooled crust in the springform pan.
- Sprinkle a third of the strawberry crunch topping evenly over the filling.
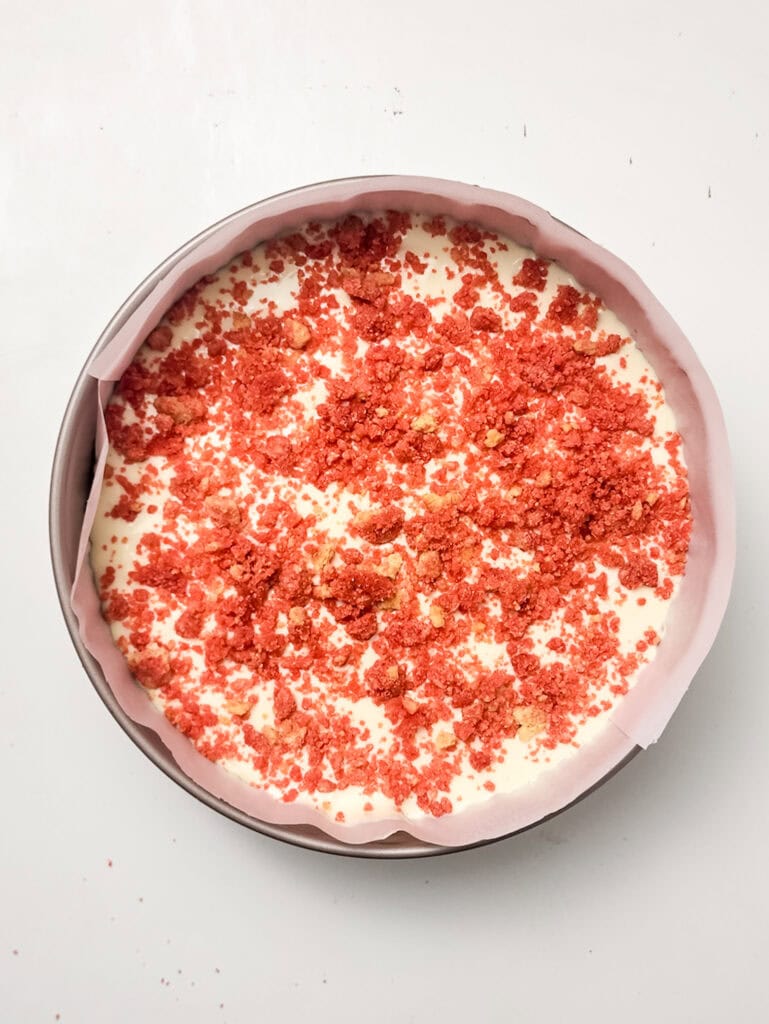
- Pour the remaining cheesecake filling on top and smooth it out with a spatula.
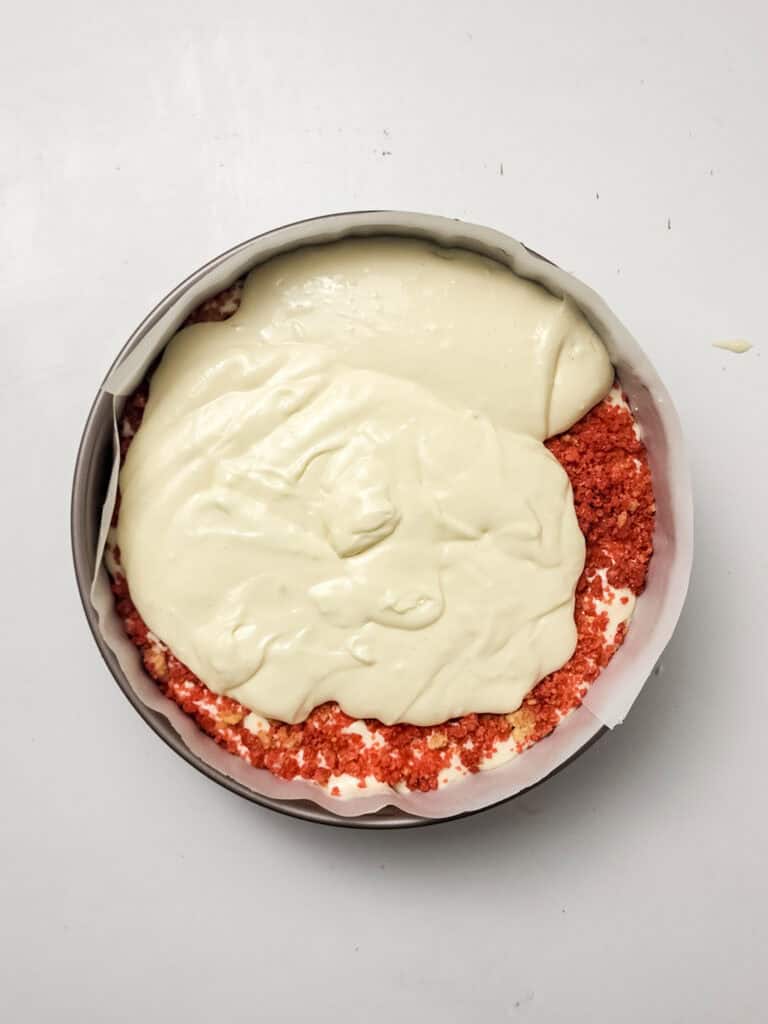
- Sprinkle another third of the strawberry crunch topping on top of the filling.

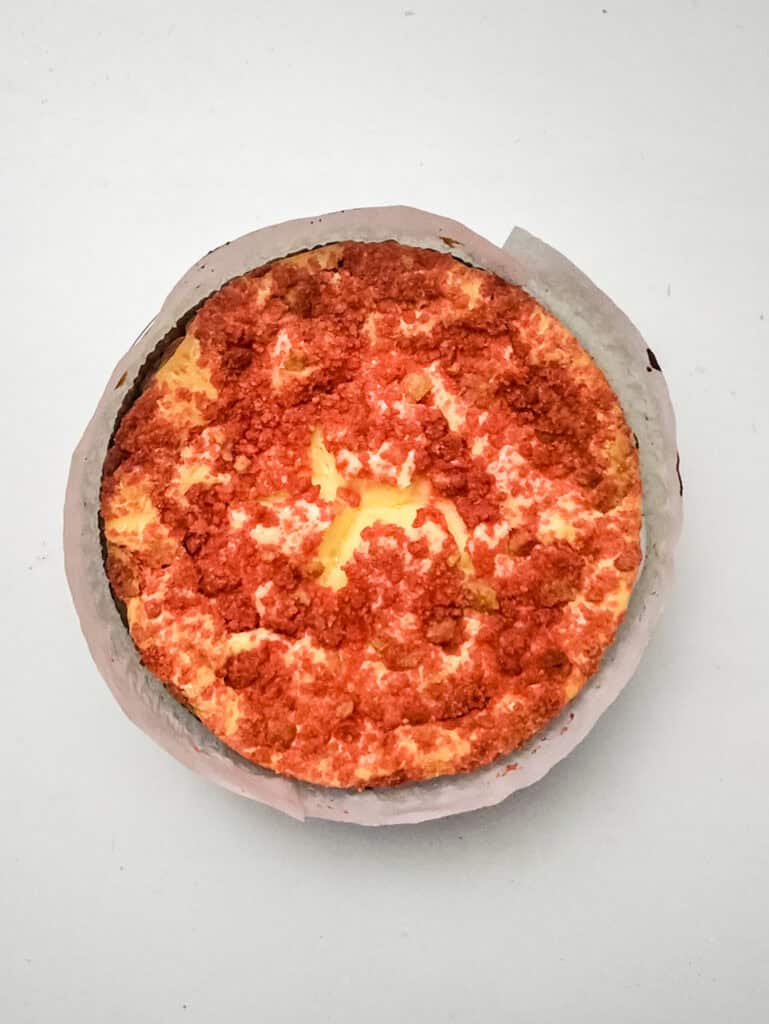
5. Bake the Cheesecake
- Wrap the outside of the springform pan with foil to prevent leaks. Place the pan in a water bath to ensure even baking and prevent cracks.
- Bake at 325°F for 55 minutes, or until the center is slightly jiggly but the edges are set.
- Turn off the oven and leave the oven door cracked open. Let the cheesecake sit in the oven for 1 hour to cool slowly.
6. Chill for Best Results
- Once the cheesecake is completely cool, cover it with plastic wrap and refrigerate for at least 3 hours or overnight. This step helps the cheesecake set and makes it easier to slice.
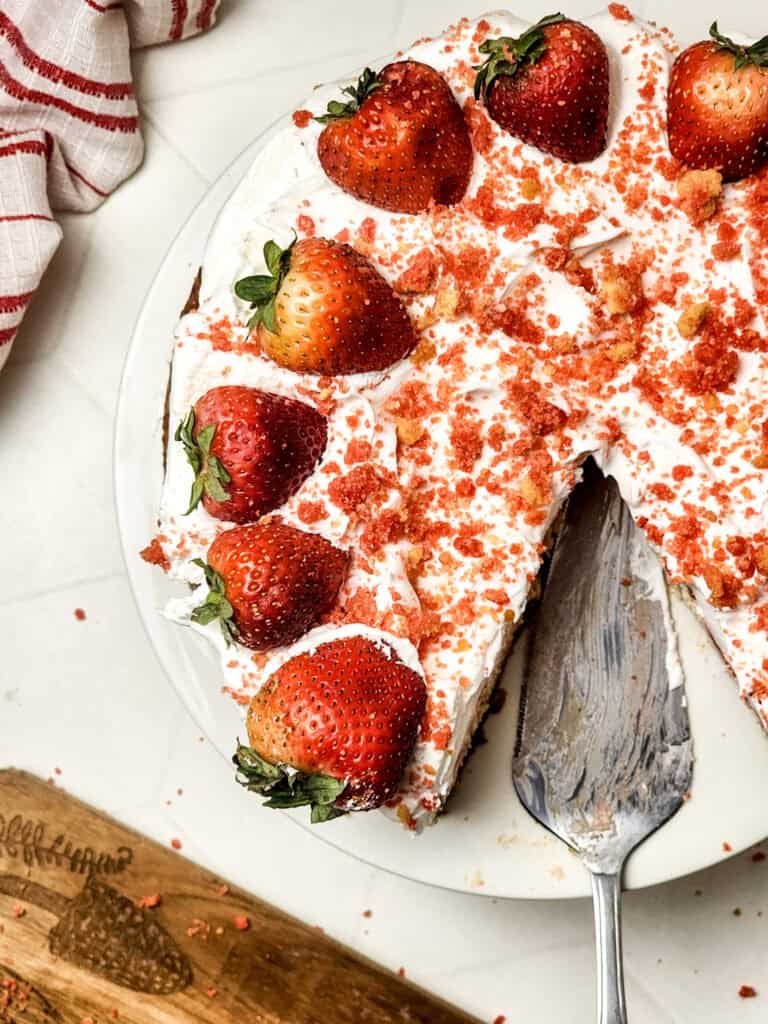
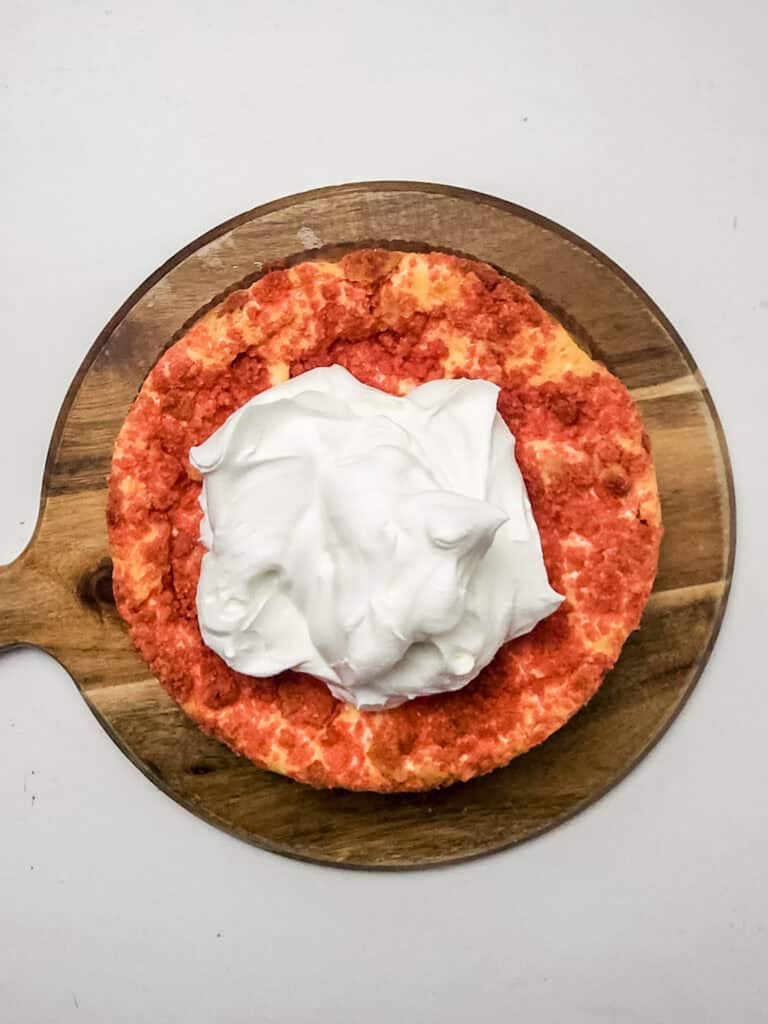
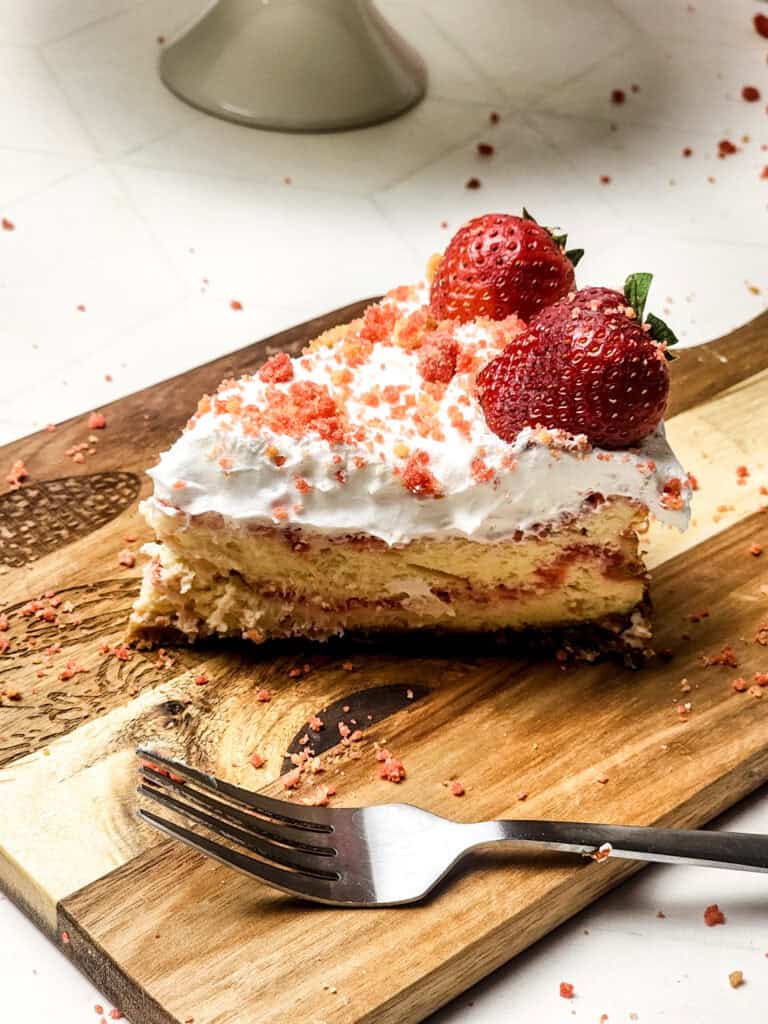
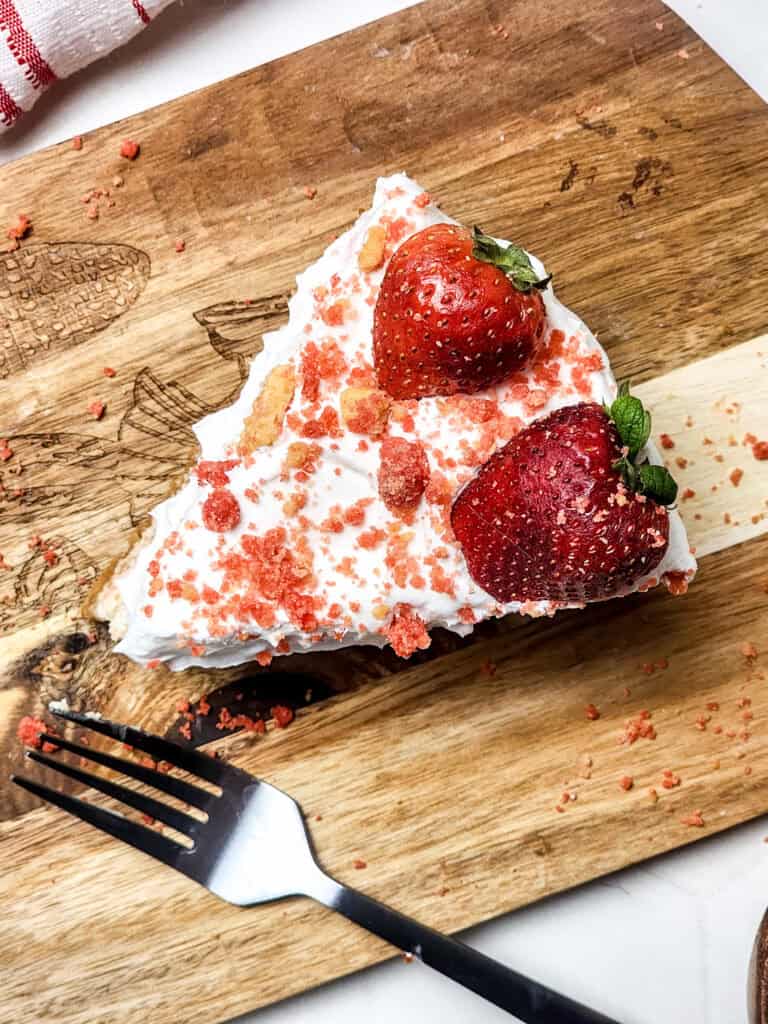
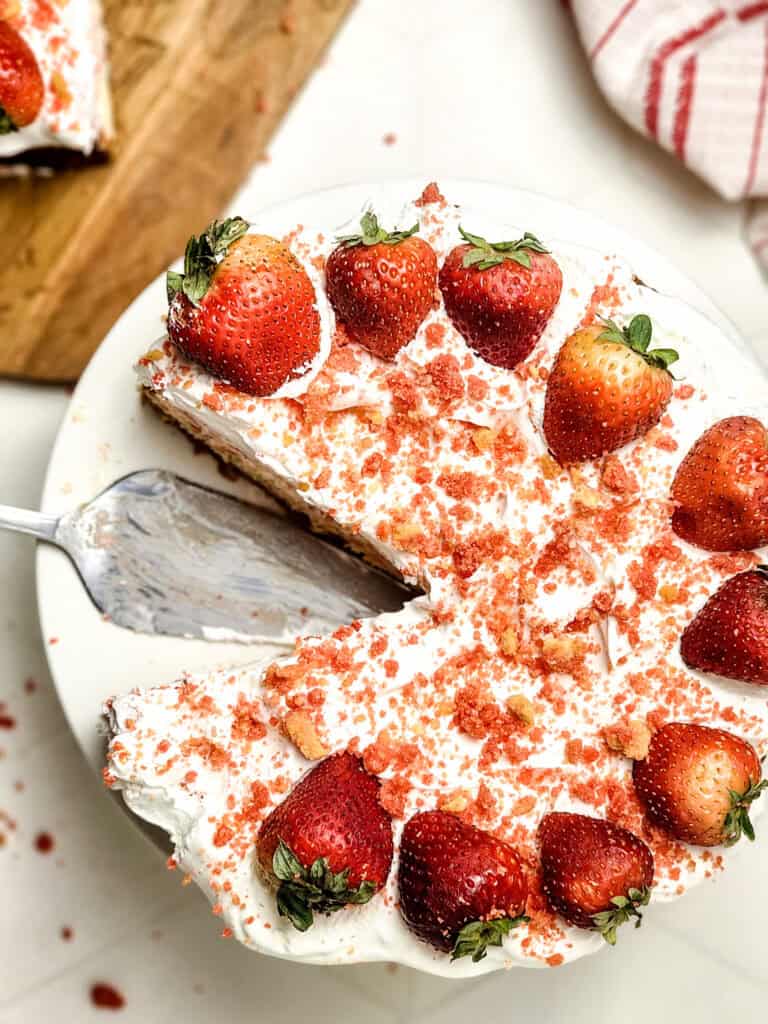
7. Decorate and Serve
- Spread whipped cream (or Cool Whip) over the top of the cheesecake.
- Add fresh strawberries or even a drizzle of strawberry sauce for extra flair.
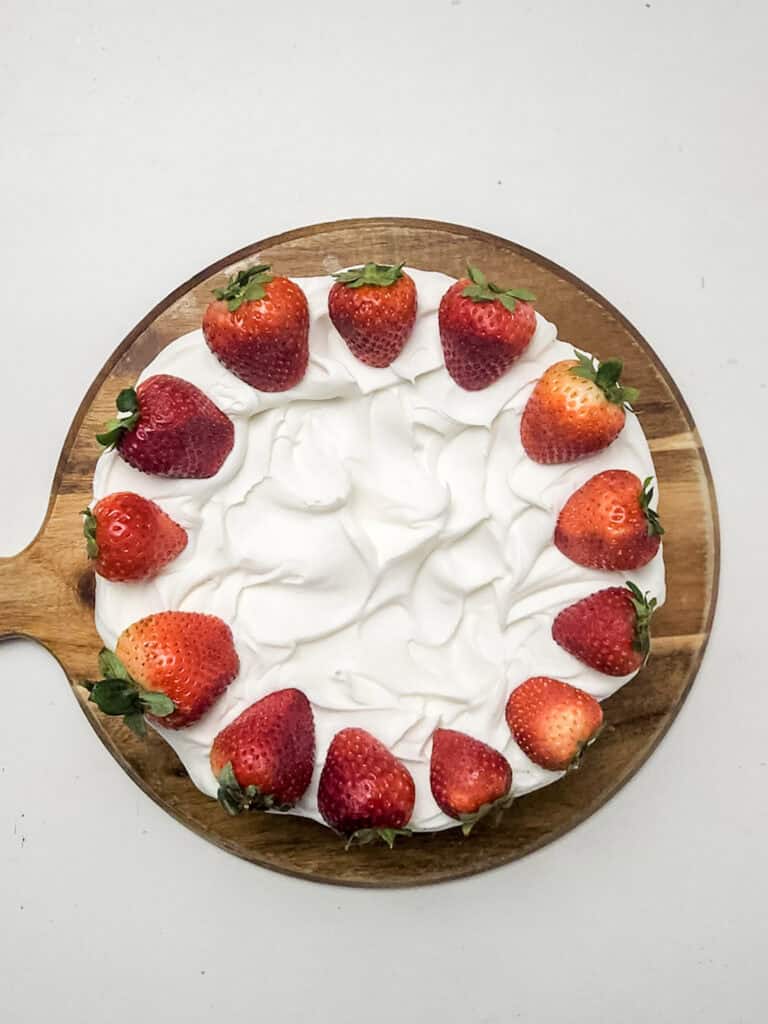
- Sprinkle the remaining strawberry crunch topping evenly over the whipped cream.
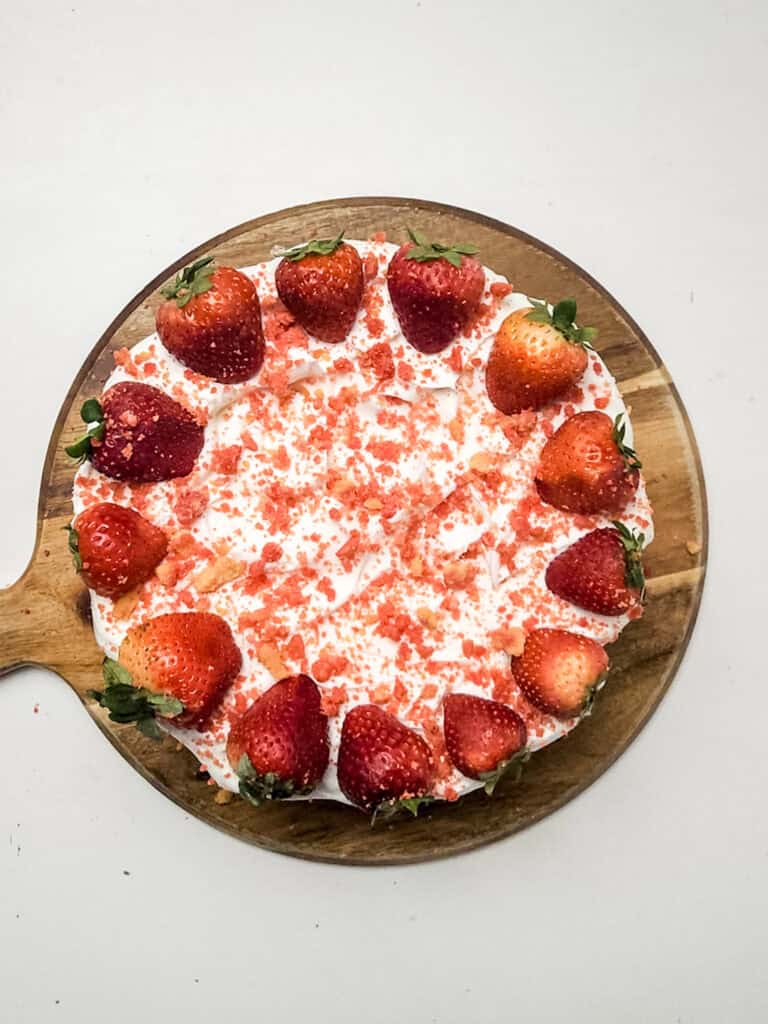
- Slice, serve, and watch everyone fall in love with this dreamy dessert!
This cheesecake may have a lot of steps, but the result is so worth it. Once you take that first bite of the creamy filling, crunchy topping, and buttery crust, you’ll see why this recipe is a favorite!
Tips for the Best Strawberry Crunch Cheesecake
Making a cheesecake might seem intimidating, but trust me—it’s easier than you think! With a little patience and a few simple tips, you’ll have a show-stopping dessert that looks like it came from a fancy bakery. Let me walk you through everything you need to know to get the perfect results.
Avoid Overmixing the Batter
Cheesecake batter requires a gentle yet thorough mixing process. Overmixing introduces air into the batter, which can cause your strawberry crunch cheesecake to rise and crack as it cools. To avoid this, beat the cream cheese until creamy, then add each ingredient one at a time, mixing slowly. A hand mixer on low speed works perfectly for this; it’s less aggressive than a stand mixer.
When adding eggs, go one at a time, mixing just until blended. Think of it like this: you want the batter smooth, not fluffy. Airy batters might work for cakes, but for a cheesecake, they’re trouble.
Bake Low and Slow
Cheesecake calls for gentle cooking, almost like a slow dance with your oven. High heat can cause the edges to overbake while leaving the middle undercooked. A steady 325°F is typically the sweet spot. Place your cheesecake on the lower third of the oven for even baking and to prevent browning on top.
Want an even more foolproof tip? A water bath, or Bain Marie, is your best friend. It creates gentle, even heat and keeps the oven humid, which prevents cracks. Wrap your springform pan with foil to seal it, set it in a roasting pan, and pour hot water halfway up the sides. It’s an extra step, but it eliminates a lot of headache later.
Monitor for the “Wobble Test”
When it comes to checking doneness, forget toothpicks or knives. Cheesecake has its own unique signal—the wobble test. Gently jiggle the pan; the center should have a slight wobble, like Jello, while the edges are set. Don’t worry, the cheesecake will continue to set as it cools. Resist the urge to overbake, as this can lead to a dry texture.
If you have a thermometer handy, the internal temperature of a fully baked cheesecake should be about 150°F in the center. While it might seem excessive, this ensures perfection every time.
Use Room Temperature Ingredients
This is one of the most important steps for a smooth, creamy cheesecake filling. Let your cream cheese, sour cream, and eggs sit out until they reach room temperature before mixing. It makes blending everything together so much easier and prevents lumps.
Don’t Skip the Water Bath
I know it might sound tricky, but a water bath is a game-changer for cheesecakes. It keeps the oven moist and ensures even baking, so your cheesecake doesn’t crack. Just wrap the outside of your springform pan tightly with foil to keep water out, and you’re good to go!
Cool Slowly for Best Results
One of the keys to a perfect cheesecake is letting it cool gradually. After baking, turn off the oven and leave the door slightly open. Letting the cheesecake cool slowly in the oven helps it set properly and prevents cracks.
Chill for at Least 3 Hours
Cheesecakes need time to chill and firm up in the fridge. While it’s tempting to dive in right away, chilling for at least 3 hours (or even overnight) gives you the creamy texture you’re looking for.
Cheesecakes Are Easier Than They Look
I get it—cheesecakes can seem like one of those desserts you need a degree in baking to pull off. But really, they’re much simpler than they seem! By following the step-by-step instructions and taking your time, you’ll have a stunning dessert with minimal effort. And the reward? A rich, creamy cheesecake that’s guaranteed to impress.
Troubleshooting Common Baking Issues
Sometimes, even with the best preparation, things go sideways. Here are a few quick fixes for common cheesecake problems:
- Cracked surface: Cover it up with an extra layer of topping or whipped cream. No one will notice!
- Soggy crust: Pre-baking the crust helps here. Don’t skip it, and always wrap your pan tightly in foil if using a water bath.
- Browning on top: A piece of foil lightly tented over the cheesecake during baking can prevent over-browning.
Strawberry Crunch Cheesecake FAQ
Here are some frequently asked questions to help you make the best Strawberry Crunch Cheesecake ever!
1. Can I use a different cookie for the crust?
Absolutely! While golden Oreos add a sweet, buttery flavor, you can substitute them with graham cracker crumbs, vanilla wafers, or even traditional Oreos if you’re feeling adventurous.
2. Do I have to use a water bath?
A water bath is highly recommended to prevent cracks and ensure even baking. If you’re not comfortable with it, you can place a pan of hot water on the rack below your cheesecake instead. It won’t be as effective but will still help.
3. What if I don’t have a springform pan?
A springform pan is ideal because it allows you to easily remove the cheesecake without damaging it. However, you can use a round cake pan lined with parchment paper if needed. Just be careful when removing the cheesecake after it’s set.
4. How do I make sure my cheesecake doesn’t crack?
Here are some tips to avoid cracks:
- Use room temperature ingredients for a smooth batter.
- Avoid overmixing the filling.
- Bake with a water bath.
- Let the cheesecake cool slowly in the oven after baking.
5. How long should I chill the cheesecake?
For the best results, chill your strawberry crunch cheesecake in the fridge for at least 3 hours. Overnight chilling is even better to ensure it’s fully set and easy to slice.
6. Can I make this cheesecake ahead of time?
Yes! Cheesecakes are perfect for making ahead. You can bake it a day or two before serving and store it in the fridge in an airtight container. Just add the whipped cream and toppings right before serving.
7. How do I store leftovers?
Store leftover cheesecake in an airtight container in the fridge for up to 5 days. To freeze, wrap individual slices tightly in plastic wrap and place them in a freezer-safe bag. Cheesecake can be frozen for up to 2 months.
8. What’s the best way to crush the cookies for the crust and topping?
You can crush the cookies using a food processor for fine crumbs or place them in a zip-top bag and crush them with a rolling pin for a chunkier texture. Either method works great!
9. Can I use fresh strawberries in the crunch topping?
The crunch topping works best with freeze-dried strawberries because they stay crispy. Fresh strawberries have too much moisture and won’t give you the same crunchy texture.
10. What should I do if my cheesecake sticks to the pan?
Make sure to line the bottom of your springform pan with parchment paper. Run a knife around the sides of the pan before releasing it to prevent sticking.
Variations and Customizations for Your Strawberry Crunch Cheesecake
One of the best things about a Strawberry Crunch Cheesecake is how versatile it is! Whether you’re looking to make a no-bake version, experiment with different crunchy toppings, or explore creative twists, this dessert can adapt to your preferences. Let’s dive into some simple yet game-changing ways to make this cheesecake uniquely yours.
1. No-Bake Strawberry Crunch Cheesecake
If turning on your oven sounds like a chore, the no-bake version is your new best friend. It’s quick, easy, and delivers the same creamy, delightful flavor without the hassle of baking.
- Choose the Right Crust: Stick to the classic Golden Oreo crust or try graham crackers for a sturdier base. Mix crushed cookies with melted butter and press into your pan. No baking required—just chill it for 30 minutes to firm up.
- Use Stabilizers for the Filling: A no-bake filling gets its structure from whipped heavy cream. Whip it to stiff peaks, then fold it into your cream cheese mixture. Powdered sugar or condensed milk can help hold it together.
- Set It Properly: Since there’s no baking involved, refrigerate for 4-6 hours (or overnight). In a rush? Freeze it for 2 hours instead.
- Adjust the Topping: The strawberry crunch topping works perfectly as-is—just skip the oven step and sprinkle it on.
A no-bake version is perfect for summer gatherings or when you want something sweet without much effort!
2. Alternative Crunch Toppings
Love the classic strawberry crunch but want to mix it up? Try these options:
- Graham Cracker Goodness: Swap golden Oreos for graham crackers for a softer crunch and nutty flavor. Pair with vanilla pudding mix for a twist.
- Vanilla Wafer Crunch: Use crushed vanilla wafers and white chocolate pudding mix for a sweet, buttery topping.
- Chocolate Lovers’ Dream: Replace Golden Oreos with chocolate sandwich cookies. Mix with cocoa powder or instant chocolate pudding for a rich topping.
- Nutty Twist: Add crushed pecans or almonds for texture and a savory edge. Works great with either strawberry or vanilla bases.
- Coconut Inspiration: Mix toasted shredded coconut with crushed shortbread cookies. Use pineapple Jello for tropical vibes.
- Mix and Match: Combine cookies like graham crackers and chocolate wafers for a layered crunch.
The key is balancing flavors—pair toppings with the crust and filling for a cohesive taste.
3. Experiment with the Filling
Take the creamy cheesecake filling to the next level with these ideas:
- Stir in a few tablespoons of strawberry preserves or strawberry sauce for a swirled effect.
- Add a splash of lemon juice for a citrusy pop.
- For a chocolate-strawberry combo, spread a thin layer of melted chocolate over the crust before adding the filling.
4. Try a Different Crust
The crust is the foundation of your cheesecake, so why not try something new?
- Classic Graham Crackers: A timeless option for a subtle crunch.
- Chocolate Cookies: Perfect for chocolate lovers.
- Cinnamon Twist: Add a pinch of cinnamon to your crust for warmth and depth.
5. Add Extra Layers
Create layers for more flavor and texture:
- Divide the filling and mix freeze-dried strawberry powder into half for a two-toned cheesecake.
- Spread a thin layer of strawberry preserves over the crust for a sweet surprise.
6. Go Mini!
Make individual cheesecakes for easy serving:
- Divide the crust and filling into cupcake liners.
- Bake at 325°F for 20-25 minutes, or chill if making a no-bake version.
7. Decorate with Style
Take your presentation to the next level:
- Arrange fresh strawberry slices in a fan pattern on top.
- Pipe dollops of cream cheese frosting around the edges.
- Sprinkle extra strawberry crunch topping along the sides for a professional look.
8. Make It Diet-Friendly
Want to lighten it up?
- Use reduced-fat cream cheese and sour cream.
- Swap in sugar-free Jello mix for a lower-sugar topping.
No matter how you customize it, this Strawberry Crunch Cheesecake will always be a hit. Stick to the classic recipe or let your creativity shine with these fun variations. Either way, you’ll end up with a dessert that’s as delicious as it is memorable!
Serving and Storing Your Strawberry Crunch Cheesecake
Once your Strawberry Crunch Cheesecake is chilled, decorated, and ready to enjoy, it’s time to serve it up and think about how to store any leftovers (if there are any!). Here’s everything you need to know to make the most of your delicious dessert.
How to Slice and Serve
- Use a Sharp Knife: For clean slices, use a sharp knife and wipe it clean with a damp paper towel between cuts.
- Chill Before Slicing: Cheesecake is easiest to slice when it’s fully chilled, so make sure it’s been in the fridge for at least 3 hours.
- Add Toppings Right Before Serving: If you’re using fresh strawberries or whipped cream, add them just before serving to keep everything looking fresh.
- Perfect Portions: This recipe makes about 12 slices, but you can adjust based on the crowd. Smaller slices are great for parties, while larger ones satisfy that serious sweet tooth!
How to Store Leftovers
- In the Fridge: Place leftover cheesecake in an airtight container or cover it tightly with plastic wrap. It will stay fresh for up to 5 days.
- In the Freezer: For longer storage, freeze individual slices. Wrap each slice tightly in plastic wrap, then place them in a freezer-safe bag or container. They’ll keep for up to 2 months.
- Thawing Frozen Cheesecake: To enjoy frozen cheesecake, move a slice to the fridge and let it thaw overnight or for a few hours before serving.
Tips for Serving Leftovers
- Dress It Up Again: Re-add whipped cream or fresh strawberries to leftover slices to make them look as good as new.
- Turn It Into a Sundae: Crumble leftover cheesecake into a bowl, add vanilla ice cream, and drizzle with strawberry sauce for an indulgent sundae.
- Make Cheesecake Pops: Freeze small cheesecake squares, dip them in melted white chocolate, and roll in strawberry crunch topping for a fun twist!

Strawberry Crunch Cheesecake
Equipment
- 10 inch Springform Pan
- Parchment Paper
- 9×13 Baking Sheet
- Parchment Paper
Ingredients
Crust
- 30 golden oreo cookies crushed
- 5 tablespoons unsalted butter melted
Cheesecake Filling
- 24 ounces cream cheese
- 1 cup white granulated sugar
- ½ teaspoon salt
- 1 ½ tablespoons all purpose flour
- 4 eggs
- 1 tablespoon vanilla extract
- ½ cup sour cream
Strawberry Crunch Topping
- 15 Golden Oreos crushed
- 2 ounces strawberry jello mix
- 3 tablespoons unsalted butter melted
Topping
- Cool Whip thawed
- Strawberries
- Extra Crunch Topping
Instructions
- Preheat the oven to 325°F. Line the bottom of a 10-inch springform pan with parchment paper and wrap the outside with foil.
- Make the crust: Mix crushed golden Oreo cookies with melted butter until combined. Press the mixture evenly into the bottom of the springform pan. Bake for 8-10 minutes. Let cool.
- Prepare cheesecake filling: Beat cream cheese until smooth. Add sugar, salt, and flour, and mix well. Add eggs one at a time, mixing just until combined. Stir in vanilla extract and sour cream until smooth. Set aside.
- Prepare strawberry crunch topping: Mix crushed Oreos with strawberry jello mix and melted butter until crumbly. Spread mixture on a parchment-lined baking sheet and bake at 350°F for 5 minutes. Let cool completely.
- Assemble cheesecake: Pour the filling over the cooled crust in the springform pan. Fill halfway, then place a third of the strawberry crunch topping. Fill the rest of the way and top with another third of the topping.
- Bake cheesecake: Bake for 55 minutes, or until the center is slightly jiggly but set around the edges. Turn off the oven and open the oven door, letting the cheesecake continue to bake and cool inside for another 60 minutes.
- Chill cheesecake: Remove from the oven, cover and refrigerate for at least 3 hours or overnight.
- Decorate cheesecake: Spread Cool Whip evenly over the chilled cheesecake. Sprinkle with the last of the strawberry crunch topping and decorate with fresh strawberries.
- Serve and enjoy: Slice and serve chilled.
Special Occasions and Everyday Indulgence
This Strawberry Crunch Cheesecake is perfect for celebrations like birthdays, holidays, or family gatherings, but it’s also an amazing dessert to whip up for a quiet weekend treat. It’s a dessert that looks impressive, tastes incredible, and stores beautifully—making it a go-to recipe you’ll want to keep in your collection.
Now, grab a slice (or two), and enjoy the sweet, creamy goodness of this delicious cheesecake! If you give it a try, don’t forget to let me know how it turned out in the comments below. Happy baking!
Sarah Lee is an ER doctor and the creator of Laid Back Bites, where she shares simple, stress-free recipes for busy lives. Living on a farmette in Oklahoma with her husband, 4 horses and 4 cats, she combines her experience in a high-pressure career with a passion for easy, comforting meals. Her unique perspective brings a sense of balance and practicality to the kitchen, helping readers create delicious dishes without the stress.
Love Strawberries and Sweet Treats? Try These Recipes!
If you’re loving this Strawberry Crunch Cheesecake, why not explore more delicious ways to enjoy your favorite flavors? Check out our fluffy Strawberry Pancakes and crispy Strawberry Waffles for a berry-packed breakfast. Craving something indulgent? Our rich Red Velvet Waffles with cheesecake filling and gooey Red Velvet Cinnamon Rolls are perfect for dessert or a special brunch. Head over to these recipes on Laid Back Bites and keep the sweetness going!
 Red Velvet Waffles Recipe with Cheesecake Filling
 Easy Valentine’s Day Bark Recipe: A Fun Sweet Treat Chocolate Lovers Will Adore